What Are Marketing Automation Workflows and Easy Steps to Implement Flows for Your Marketing
Reading Time: 8 minutes
In the world of technology, where your competitor is just a click away, winning a customer is only one part of the battle won. There is a lot more you need to do to in order keep them on your platform. Engaging customers throughout their journey means executing different activities right from onboarding new users to engaging existing customers to leverage them for referrals. It does not end here. You’ll have to continue to do this for each new user. Marketing Workflows are a great way to achieve these engagement goals for your app or website.
What Are Marketing Flows
Throughout the customer journey, you’ll need to perform certain activities to onboard, engage, and retain your customers. You can either individually execute each activity for every new customer or put them on autopilot. Omnichannel Marketing Automation Workflows help you with the latter.
Instead of following each customer throughout their journey and engaging them with several one-off messages, you can create robust Flows that work according to predefined logic. This creates a self-sustaining customer engagement engine.
We have put together this in-depth guide to show how you can use Workflows to automate your customer journey activities. We’ll focus on the four stages of your customer’s journey:

| Bonus Content
👉 Ready-to-Use Omnichannel Marketing Workflows To Grow Conversions [Download Ebook] 👉 Beginner’s Guide to Omnichannel Marketing for 2021 [Download Ebook] |
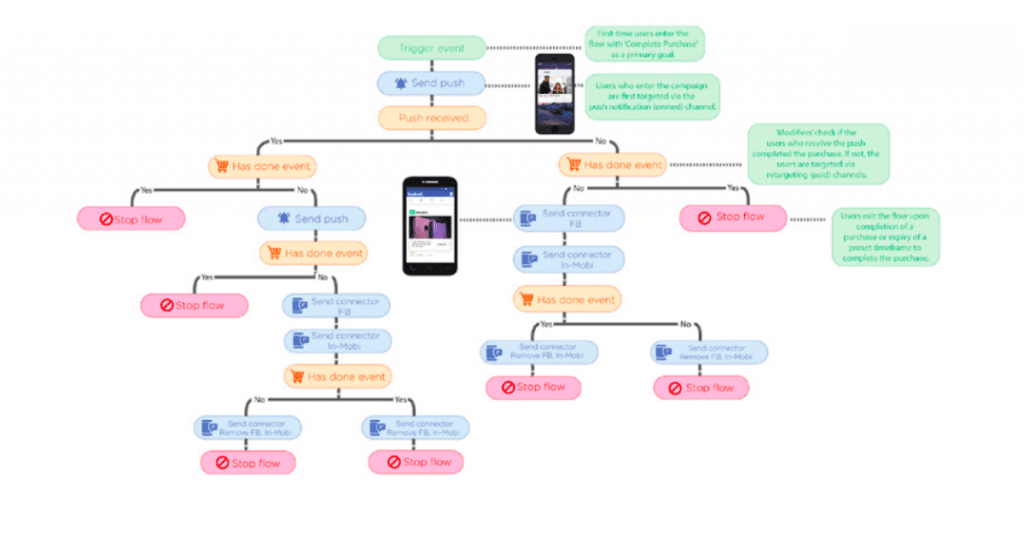
Here’s an example of a Workflow that you could use to onboard new users to your mobile app.
Why Do You Need Workflows?
To understand this, let us give you an example. Tokopedia is one of Indonesia’s largest online marketplaces, with a user base of over 75 million active users. Tokopedia used to have a high rate of user churn, with nearly 60% of the users uninstalling the app within the first month. They decided to improve the first-month user retention by using an integrated customer onboarding strategy. They identified the various steps in user onboarding to deliver the right message at the right time and to reduce ambiguity.
Tokopedia created a series of integrated cross-channel campaigns that targeted users with messages across owned and paid channels such as Email, SMS, Push Notifications, and Ad-retargeting. Tokopedia was able to improve first-month user retention by a whopping 60% and increase the first-purchase rate by up to 20%.
All Tokopedia needed to do was visualize how they could leverage various touchpoints in customer onboarding to engage and retain the customers. Imagine the amount of time and money that marketers at Tokopedia would have to put in had they done these activities manually. That’s the advantage of using a workflow. It simplifies the marketing operations for the marketers.
Workflows also offer several other benefits that include:
- Minimize user attrition and improve customer LTV: As in the case of Tokopedia, marketers were able to identify the touchpoints that they could use to deliver the right message at the right time. This helped them to engage the customer and minimize first-month attrition by 60%. Besides reducing user attrition, you can also use Workflows to improve customer LTV by engaging and re-engaging with customers at every stage of the customer journey. Fave, an award-winning deals and discounts platform, used automated workflows not just to drive first purchases, but also re-engage with those who completed a purchase using push notifications. The result was a 2X increase in LTV.
- Save time and cost: With the help of a workflow, you can put all the activities at each stage of the customer journey on autopilot. This will save your time to focus on strategic initiatives and creative activities. Putting your activities on autopilot also reduces the cost incurred due to human errors and lengthier time to market.
- Offer a consistent experience across channels: According to the Interactive Advertising Bureau (IAB), 90% of consumers show high purchase intent when they receive a consistent experience across different channels. However, research reveals that nearly half of the retailers face challenges visualizing data in a centralized way. This can make it difficult to create a consistent experience across channels. With Workflows, you can craft unique offers and messages for each channel, and deliver a consistent experience to the users. Take Kredivo, for instance. This Indonesian Fintech company used Workflows to send customized offers and messages to users via emails and push notifications. The relevant messaging and the consistent experience helped Kredivo to increase their conversions by 40% within ten months.
- Delight your customers: The great Warren Buffet once said, “It takes 20 years to build a reputation, and five minutes to ruin it.” A happy customer will be the one who will boost your reputation and get you more customers. So, use this opportunity wisely to delight your customer at every stage. Use Workflows to ensure that your customer has a positive experience not just during conversion but also during onboarding, retention, and the exit stage.
How to Build Workflows Easily for Your Marketing Campaigns
Now that we have introduced Workflows and their key benefits, let’s get down to doing some actual work. In this section, we’ll talk about building automated workflows using a marketing automation platform. While creating a new Workflow, you first need to set a goal. We’ve included it right after the name to keep you focused on the desired outcome.
| Pro Tip: Before you start to create the actual Flow, draw it out on a whiteboard/chalkboard or a sheet of paper. It’s not important how it looks but pay attention to the logical flow.
One Mo Tip: If you’re a MoEngage customer, you can engage users across channels like push, email, SMS, and in-app. You can add campaigns for different channels and design the Flow to reach out to users based on their channel propensity. |
Once you get to the Flow canvas, you can start putting together the building blocks for the Flow. There are four stages to setting up Workflows. They are:

Entry Condition
The entry condition defines who gets added into the journey and when. This means that only users who satisfy the entry condition will be allowed to enter the Flow. You can segment the users based on user events or properties. For example, you can enter users who have “Last known city” to be Chicago and have not executed “Made Purchase” in past 30 days, into the Flow two hours after they open the app again.
Define the Actions
The next step is to determine the action to be taken when the user enters the Flow.
- Send Push: Marketers can send personalized push notifications to the users based on user They can also import the message from an existing campaign using the campaign ID.
- Send Email: Marketers can send emails to the user on their active email ID used for They can either personalize the email message based on user attributes or import it from an existing campaign using the campaign ID.
- Send Connector: When a user comes to this stage, you can send a connector request as per the user data to the chosen connector end-point.
- Send SMS: An SMS is sent to the user as per the SMS settings when they enter this You can personalize your SMS message using personalization. However, before you use SMS in your Flows, ensure that you have configured the SMS settings.
Using this Workflow, you can send a push notification to welcome any user that signs in to your mobile app. If they’ve engaged with the push notification and performed
Set the Conditions
Conditions are always evaluated within a certain time range starting from the time when the user moved to this stage from the previous stage to the time set by you in condition.
- ‘Has done event’ condition: It evaluates whether the user has completed a certain event/action (or a combination of them) basis which marketer may direct them to different treatments/paths in the Flow. For example, if your user comes to event condition evaluation after viewing a product page, and if you want to check if the user has added the product to the cart and made a purchase within 2 hours, the system will automatically check for the next two hours if the condition has been fulfilled. If the condition is fulfilled, it will move the user to the ‘Yes’ branch, if not, it will move them to the ‘No’ branch.
- ‘Check attribute’ condition: Evaluates whether specific user attribute (or a combination of them) is set as the required value. You can use it to set tags/user property when the user fulfills a certain condition in their backend systems.
Define the Campaign Conditions
The next step is to check the campaign conditions, which includes:
- Emails: This gives you details such as whether the user has opened the email message, clicked the email message, unsubscribed from the list, and whether the email was marked as spam, hard-bounced, or not sent because of previous hard bounces, spams, or complaints from the user.
- Push: It allows you to check if the user has received the push notification, dismissed the received push notification, or has clicked it. Note: The updates on receiving and dismissing push notifications are valid only for Android.
Flow Controls
Control blocks are placed in journeys to control the Flow, i.e. to add required time delays or connect the current stage to any other stages in the same Flow. You can add controls to your workflow such as:
- Add wait time: The system will wait for the configured time before taking the following action. During the wait time, the system will not evaluate any condition or take any action. It is mainly used to delay the communication by days or hours once the user becomes eligible to receive any communication.
- Go-to: This option will let you send your users to any current stage in the same Flow.
Best Practices to Follow While Implementing Workflows in Marketing Automation
- Define the right metrics: Before you create a Workflow, define the outcome you plan to achieve through it. Is the purpose of the Workflow to create awareness about a new product launch or is to drive conversions? A clearly defined metric will help you create a watertight Workflow for your campaigns.
- Place the customer journey at the center while planning the Workflow: Understand where the user is in the buyer journey and craft your messages accordingly. For example, new users on a shopping app may be drafted into a flow that encourages them to register, check out the products or collections, and complete a purchase. Likewise, a frequent user of the same app can be targeted with product recommendations that complement their past purchases. Inactive users can be targeted with coupons/discounts that encourage them to come back to the app.
- Identify the right channels and frequency to deploy the campaign: Create Flows that reach users only during the best times with your message on the right channel. Maintain sufficient time delays between communications. Identify the best channel for each type of communication or message. For example, if you want your user’s immediate attention, a push notification would work better than an email. Optimize CPT metrics (Cost of reaching users) by first reaching users on push/email channels before retargeting them using third-party paid channels such as Facebook.
- Always experiment, analyze, and iterate to achieve the goals: You can use workflows to solve pain points (think ‘Cart abandonment’), improve KPIs (think ‘DAUs’/’MAUs’), or achieve end-goals (think ‘Completed transactions’). No matter what your goal is, always experiment and do an A/B test to know what works well for your campaign. Measure the results in real-time, identify what can be improved in your campaign, and make regular iterations to achieve your goal.
If you’ve found this article helpful, there’s more. Download our eBook “Ready-to-use Omnichannel Marketing Workflows to Grow Conversions” and learn the best practices to follow while implementing Workflows for your brand. We’ve also included Workflow examples used by brands like Tokopedia, Fave, and Kredivo to successfully achieve their marketing goals.
Here’s What You Can Read Next |

