

Introduction
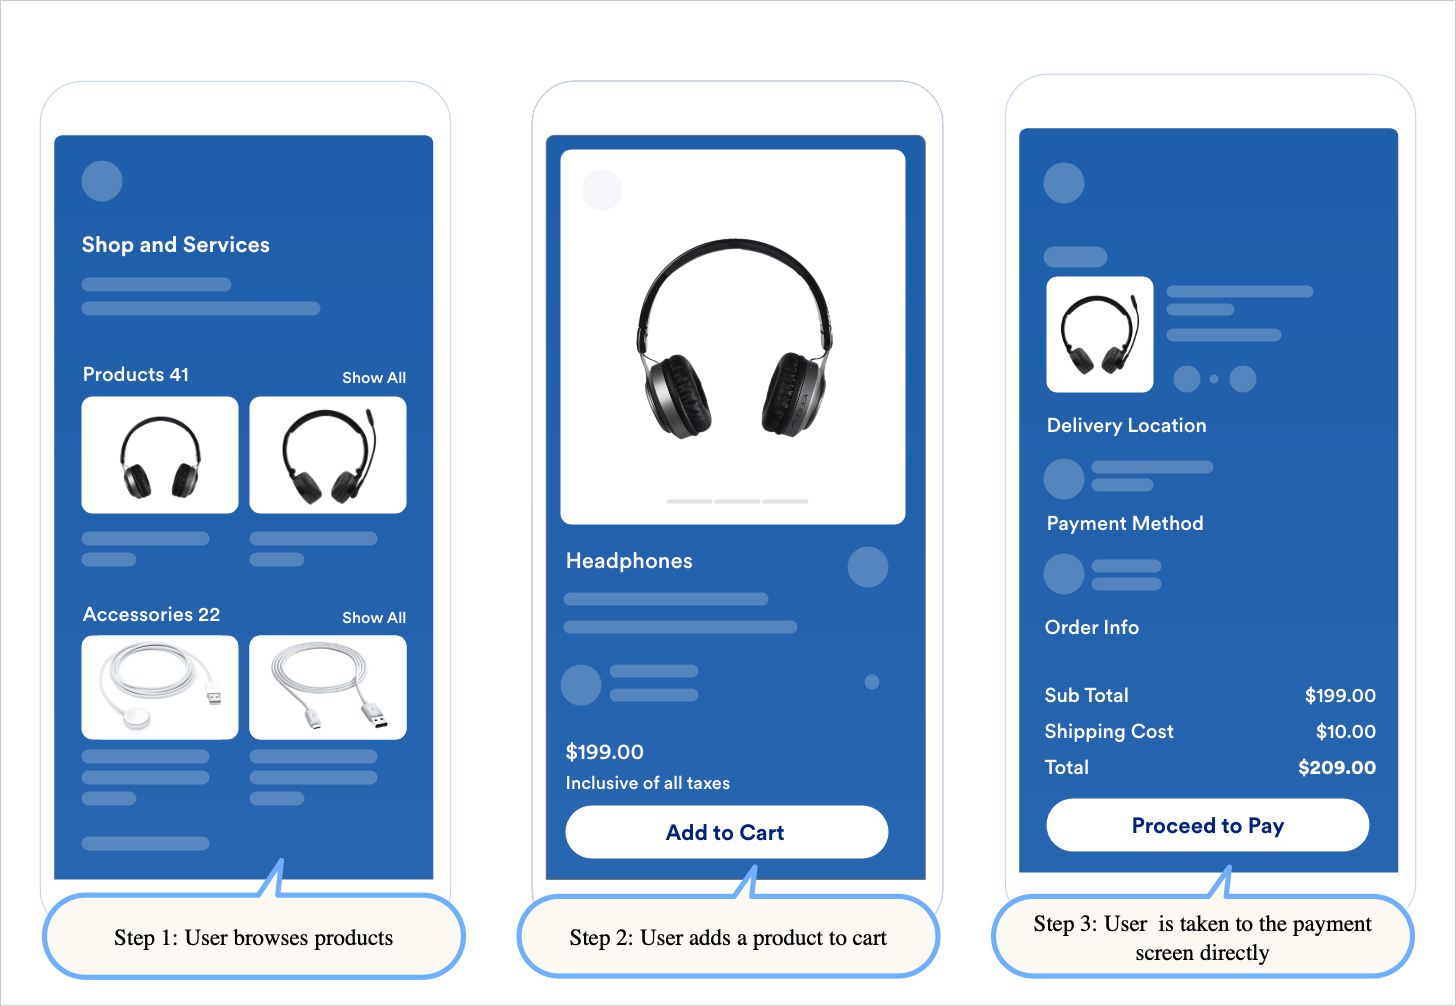
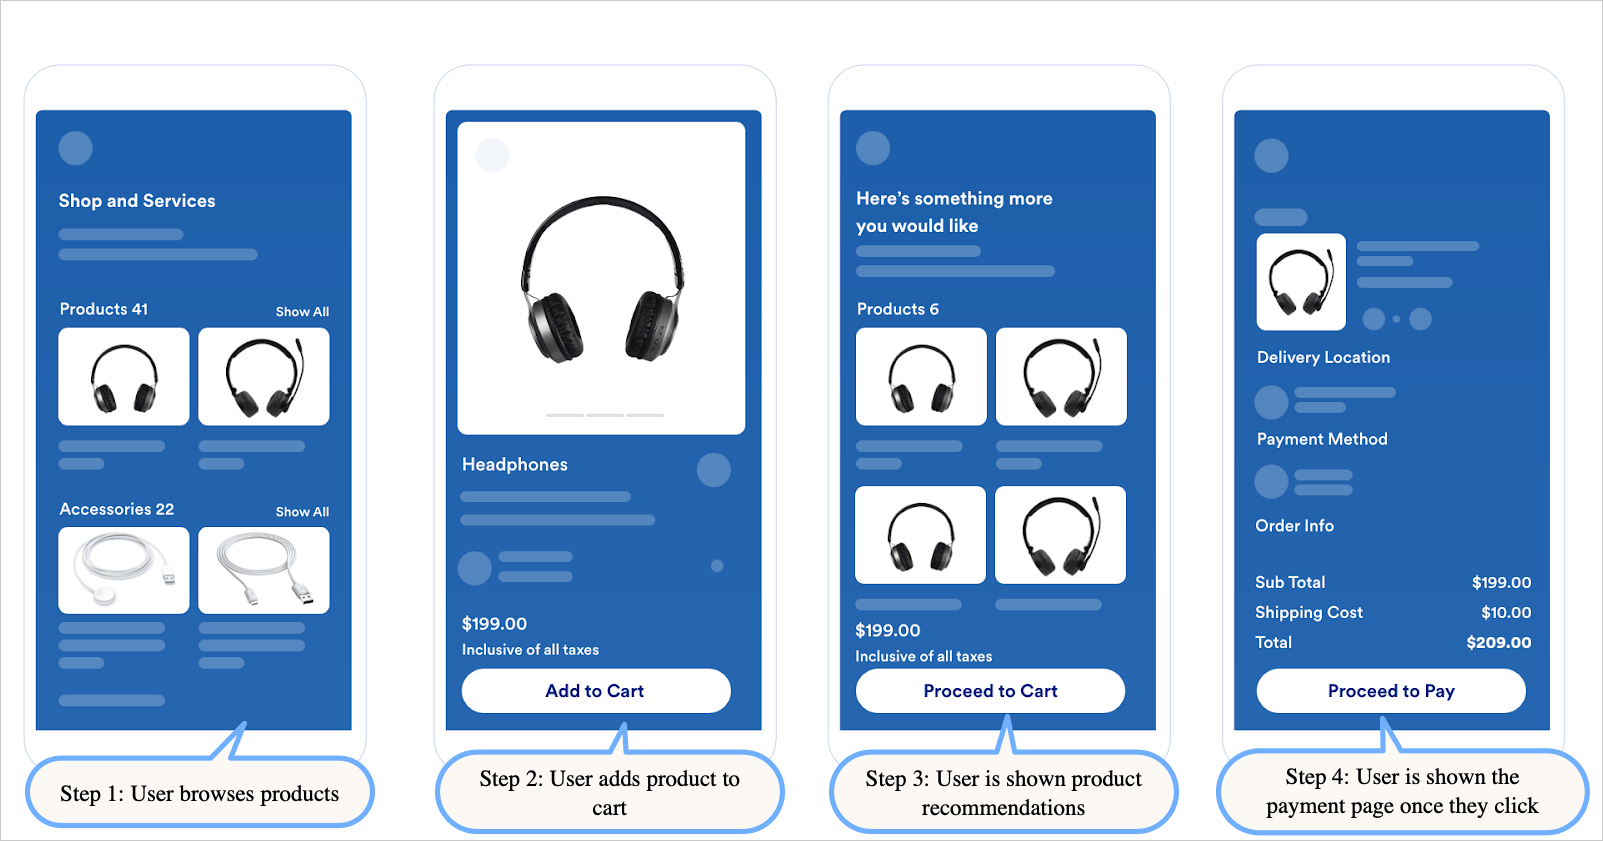
A feature flag lets you decide which users see a feature in your app, and change that decision without releasing a new app build. You control the flag from the MoEngage dashboard, and your app reads its value at runtime. MoEngage does not ship a separate feature-flagging product. Instead, you build feature flags from self-handled in-app campaigns: the campaign delivers a JSON payload to your app, and your app reads the values in that payload to decide which experience to render. Because the payload is campaign content, you can target it by segment, hold back a percentage of users with control groups, and compare variants with A/B testing. In this article, you will build a feature flag that sends frequent buyers straight to the payment screen after they add an item to the cart, while non-frequent buyers see a product recommendations screen first.Expected Result
Two user segments receive different values for the same flag, so the same app build produces two different checkout paths. You can change either path, or switch a segment off entirely, by editing or pausing a campaign.- Frequent Buyers
- Non-Frequent Buyers
How Feature Flags Work in MoEngage
A feature flag has three parts:- The audience: a segment that defines who gets a particular value of the flag.
- The flag value: a JSON payload delivered by a self-handled in-app campaign.
- The app logic: code in your app that reads the payload and renders the matching experience.
Create one self-handled in-app campaign per flag value. A single campaign targets a single audience and carries a single payload, so a flag with two values for two segments needs two campaigns. Users who match no campaign receive no payload, and your app falls back to its default experience.
Example: Personalize the Checkout Flow
The following example sets up a flag named “Payment flow for frequent buyers,” with one value for frequent buyers and one for non-frequent buyers.Step 1: Create the Segments
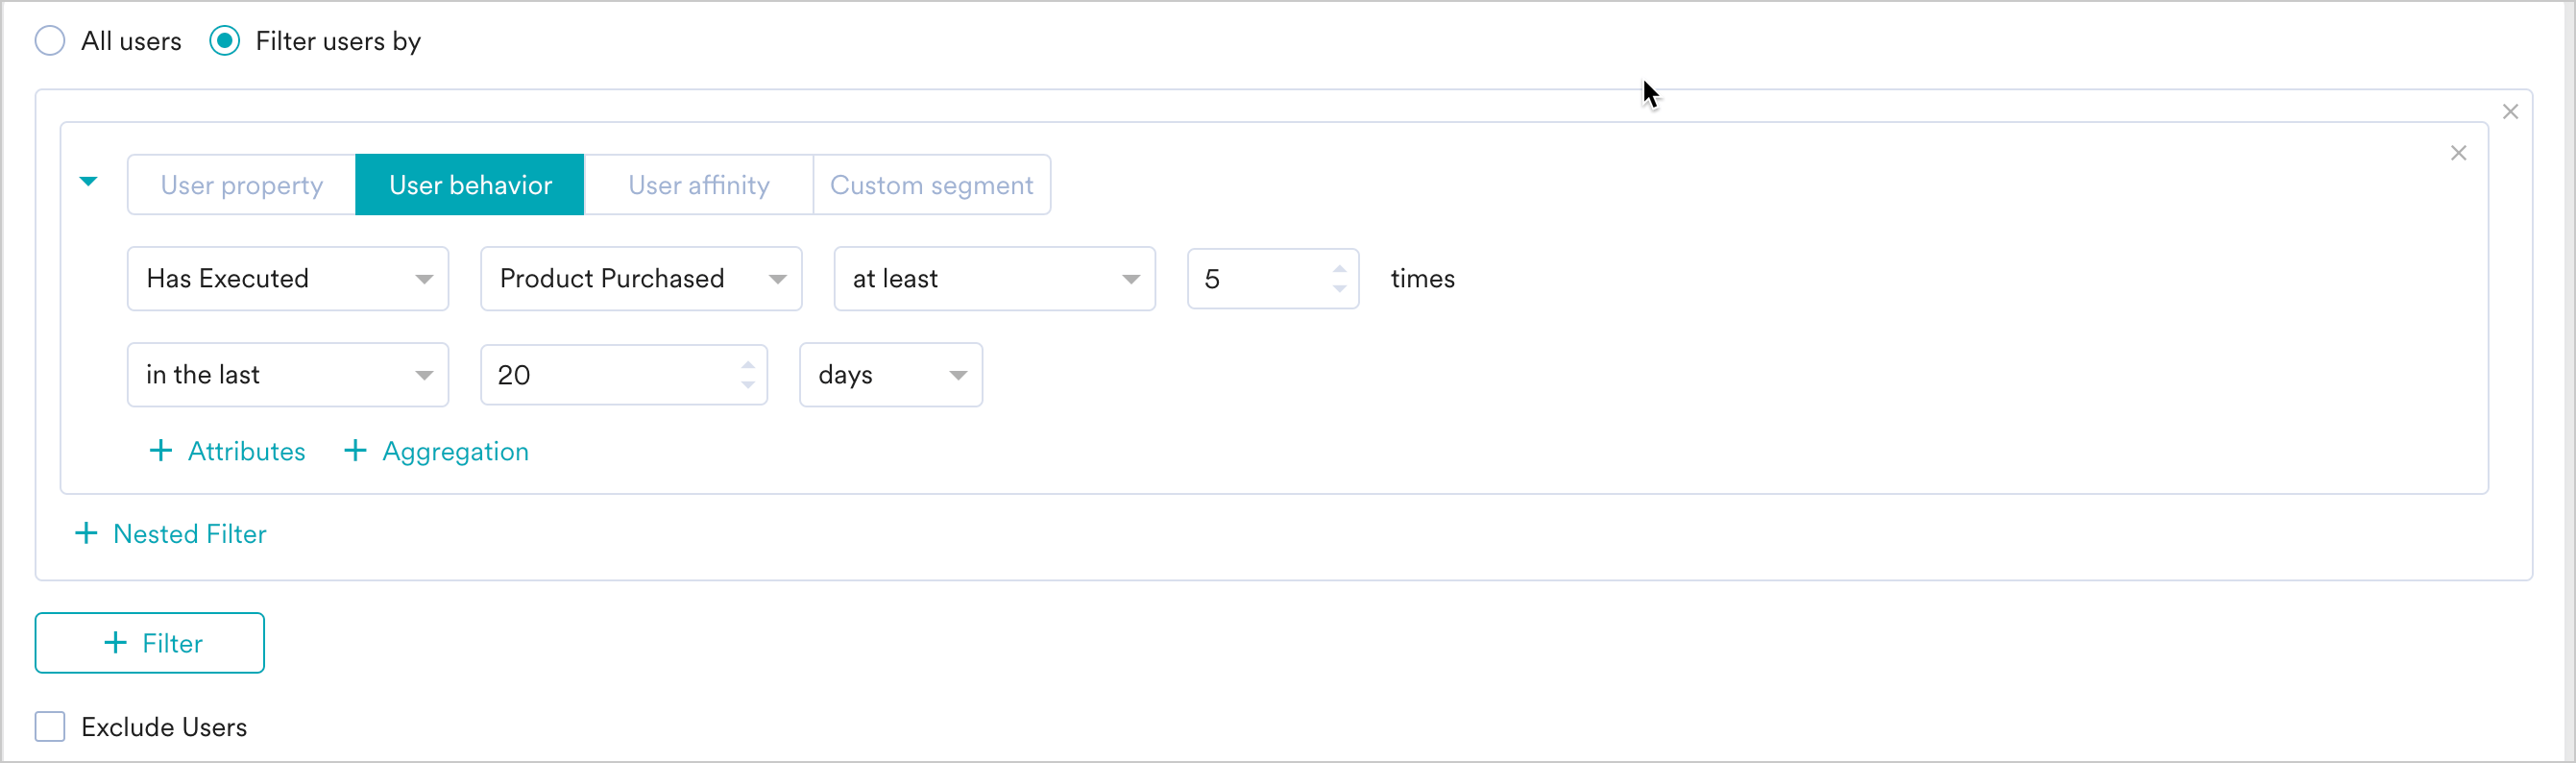
Define the two audiences before you create the campaigns. You can create them in the Target audience section during campaign creation, or in advance from Segment > Create segment. In the Filter users by section, add a User behavior filter on the Product Purchased event:- Frequent buyers: users who have executed Product Purchased at least five times in the last 20 days.
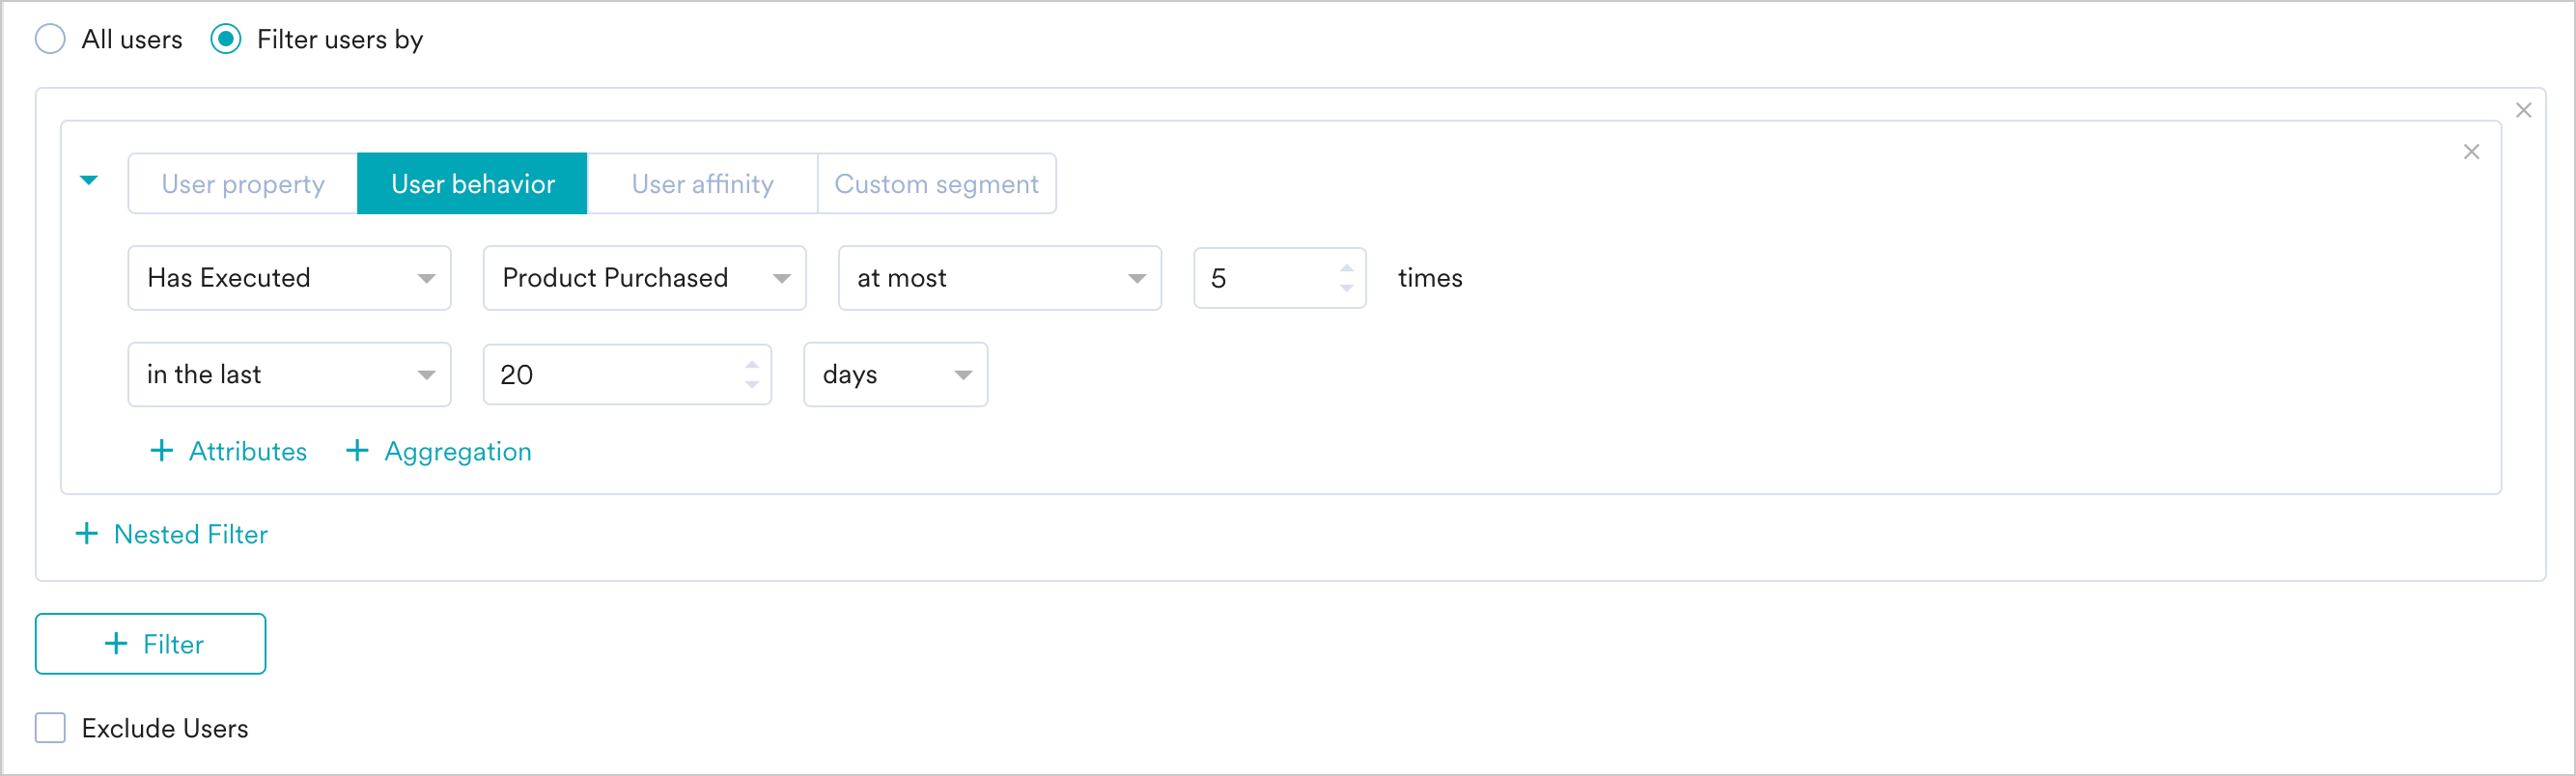
- Non-frequent buyers: users who have executed Product Purchased at most five times in the last 20 days.
- Frequent Buyers
- Non-Frequent Buyers
If you already have a fixed list of users for the rollout, upload it as a file segment instead of defining rules. For more information, refer to File Segments.
Step 2: Define the Flag Payload
Decide the keys your app reads and the values each segment receives. This example uses two keys:buy_now_action records which event the button represents, and buy_now_url records where the button navigates.
- Frequent Buyers
- Non-Frequent Buyers
Step 3: Create the Self-Handled In-App Campaigns
Repeat these steps once for each segment, using that segment’s payload from Step 2.Step 3.1: Target Users
- In the left sidebar, click Engage > Campaigns, and then click + Create campaign.
- Under Inbound, click In-app.
- Enter a Campaign name that identifies the flag and the segment, such as “Payment flow flag - frequent buyers.” Select the relevant Campaign tags.
- In the Target Platforms section, select the platforms your app runs on.
- In the Trigger Criteria section, select when your app should receive the payload. Select On app open if the flag governs a screen the user can reach at any point in the session.
- In the Target audience section, select the segment you created in Step 1.
- In the Control Group section, specify the users to exclude from the campaign. For more information, refer to Roll Out the Feature Gradually.
- Click Next.
Step 3.2: Content
- Go to the Custom template editor, and then click Self-Handled.
- In the payload field, enter the JSON payload for this segment from Step 2.
- In Template Settings, configure the settings for each device type you target.
- Preview the campaign, and then click Next.
Step 3.3: Schedule and Goals
- In the Send campaign section, define when the campaign starts and ends, along with its frequency and limits. A feature flag usually runs with no end date, so the flag stays active until you pause the campaign.
- In the Conversion Goals section, add the goals that tell you whether the flagged experience performed better. For this example, track the Product Purchased event.
- In the Delivery Controls section, configure the controls your rollout needs. For more information, refer to Create In-App Campaign.
- Click Publish.
Step 4: Consume the Payload in Your App
Your app receives the payload when a user qualifies for one of the campaigns. Readbuy_now_action and render the matching screen:
- When the value is
purchase, take the user to the payment screen. - When the value is
add_to_cart, take the user to the recommendations screen, and provide a path from there to the payment screen. - When no payload arrives, render your default checkout flow.
Roll Out the Feature Gradually
Use control groups to hold back part of the target audience, so you can compare users who received the flagged experience against comparable users who did not.- Campaign control group: set the percentage of the campaign’s target audience to exclude, in the Control Group section of Step 1. Increase the flagged audience by lowering this percentage over time.
- Global control group: set the allocation for a workspace-wide holdout in Settings > Control Groups. For more information, refer to Global Control Group.