

- A table becomes either a user schema or an event schema.
- The columns in that table become user properties or event attributes, depending on which kind of schema the table belongs to.
Prerequisites
- A connected data warehouse. The connection steps and the read permissions MoEngage needs differ by warehouse. For more information, refer to Connect Your Data Warehouse.
- The Admin or Developer role, which both include warehouse schema access by default. Other roles need it granted through a custom role.
Warehouse schemas support BigQuery and Databricks.
How a Warehouse Schema Works
MoEngage does not copy your warehouse data. It reads your schema definitions, builds a SQL query from the filters selected in the segment builder, and runs that query against your warehouse when a segment is evaluated. Each schema maps one table or view in your warehouse. There are two kinds:
Create the user schema first. An event schema is joined to the user schema on the user ID column, so there is nothing to join against until the user schema exists.
How Users Are Matched
Every schema is anchored on a user ID column, and the same column has to work on both sides of the join: it identifies a user in your warehouse, and its values have to match the customer ID on users in MoEngage. Only users that match are segmentable. If a query returns 100 user IDs from your warehouse and 50 of them exist in MoEngage, the segment contains those 50. The other 50 are skipped, because MoEngage has no user to target. Mapping a schema never creates users. To bring new users into MoEngage, use Imports.Set the Event Look-Back Window
Before you map your first table, set Max event look-back. This is how far back in days MoEngage reads event data from this warehouse. It defaults to 60 days and is mandatory. The setting applies to every schema on that connection, so you set it once rather than per schema. It bounds event tables only, because a user master table is not time-based. You can change it later from the same field.Create a User Schema
The user schema points at your user master table, the single table that holds every user ID you want to segment on. Each connection has exactly one user schema, and you must create it before any event schema. To create a user schema, perform the following steps:- On the sidebar menu in MoEngage, click Settings. The Settings page appears.
- Under Data, click Warehouse Schema. The Warehouse schema page appears.
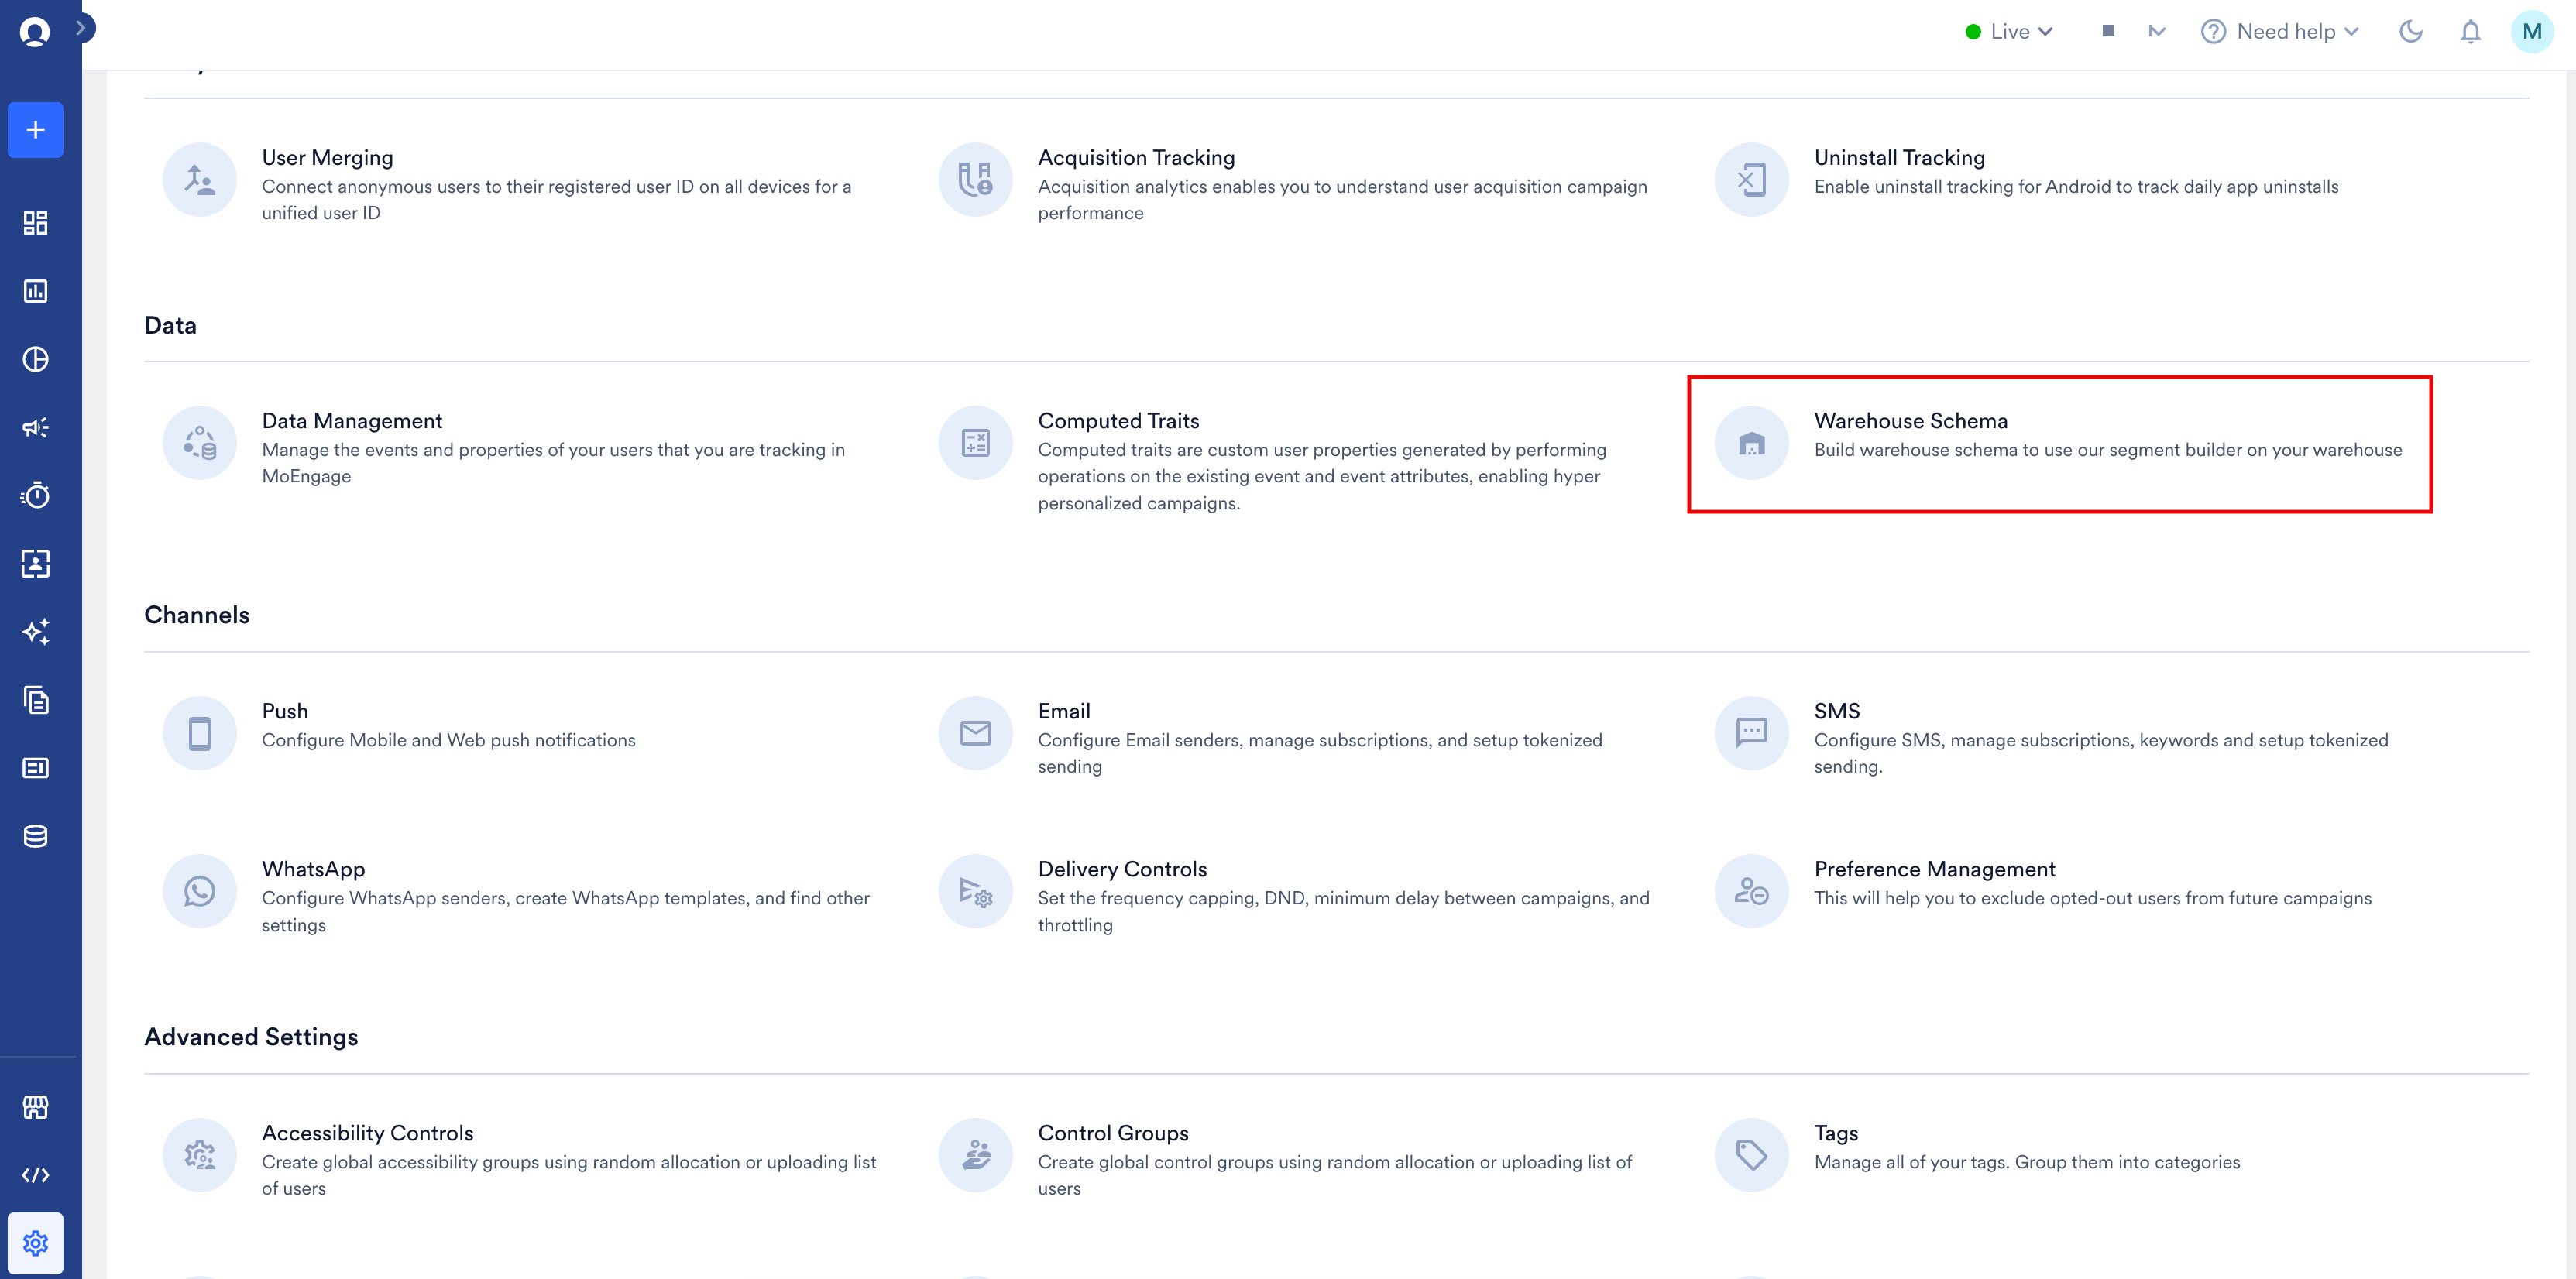
- Select your connection from the dropdown beside the page title.
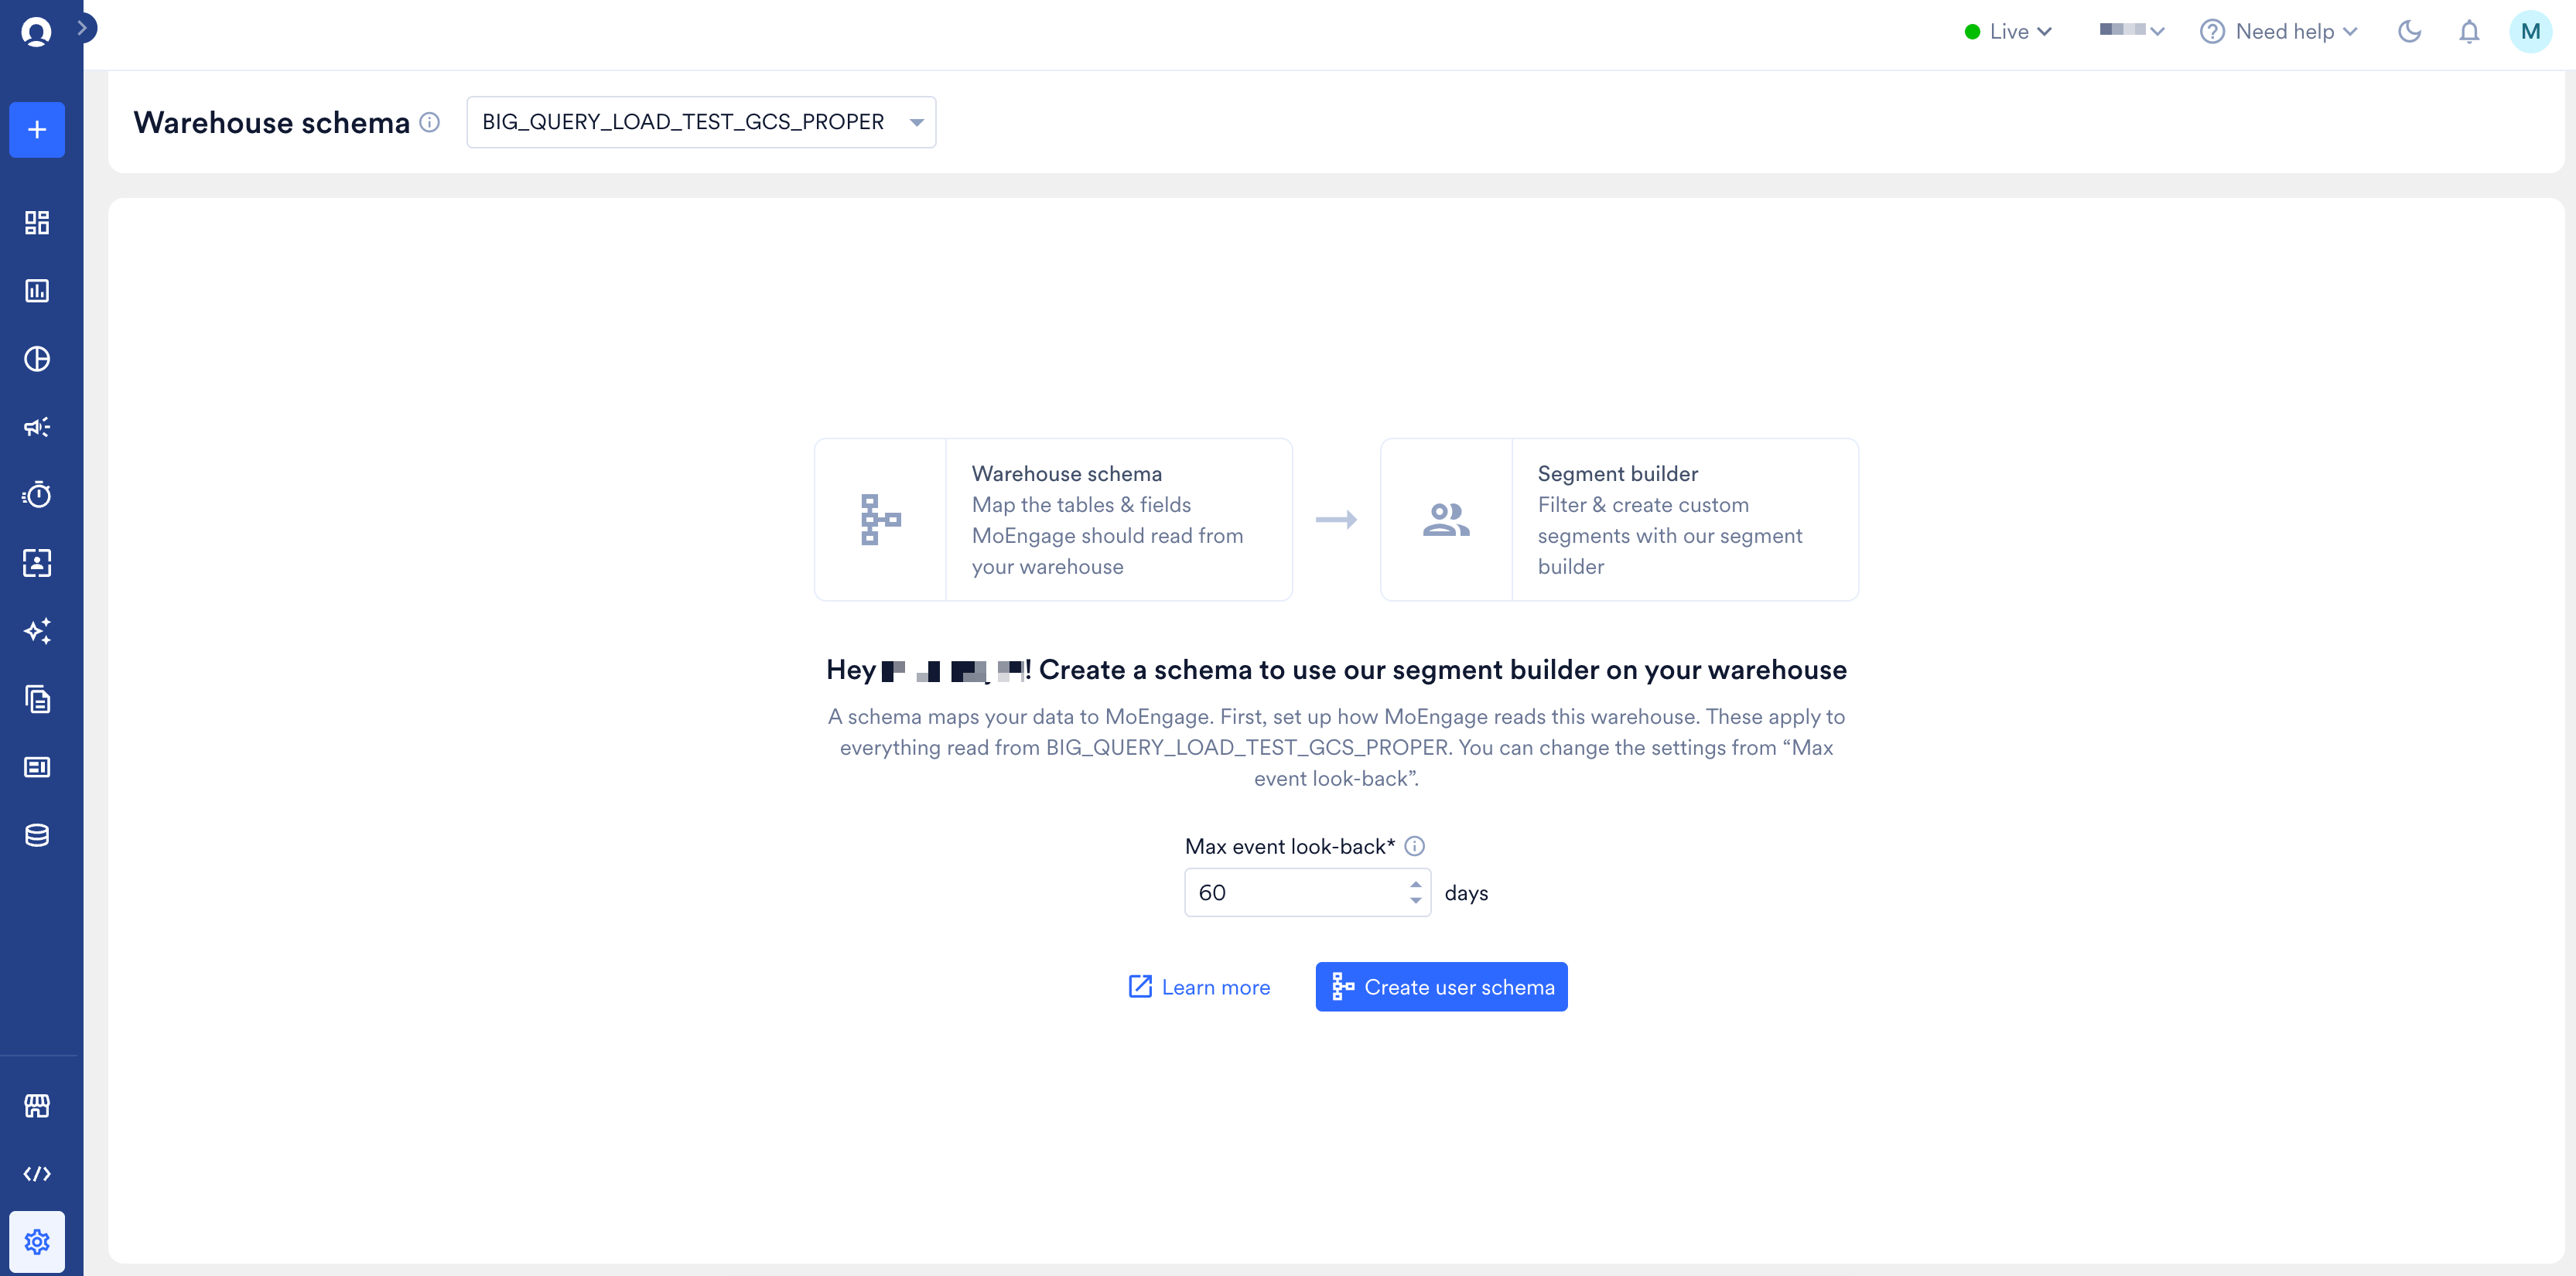
- In Max event look-back, enter the number of days of event history MoEngage should read from this warehouse. The default is 60 days. For more information, refer to Set the Event Look-Back Window.
- Click Create user schema. The Create user schema page appears.
Step 1: Source and Format
First, point MoEngage at the table you want to read, and confirm it holds the data you expect.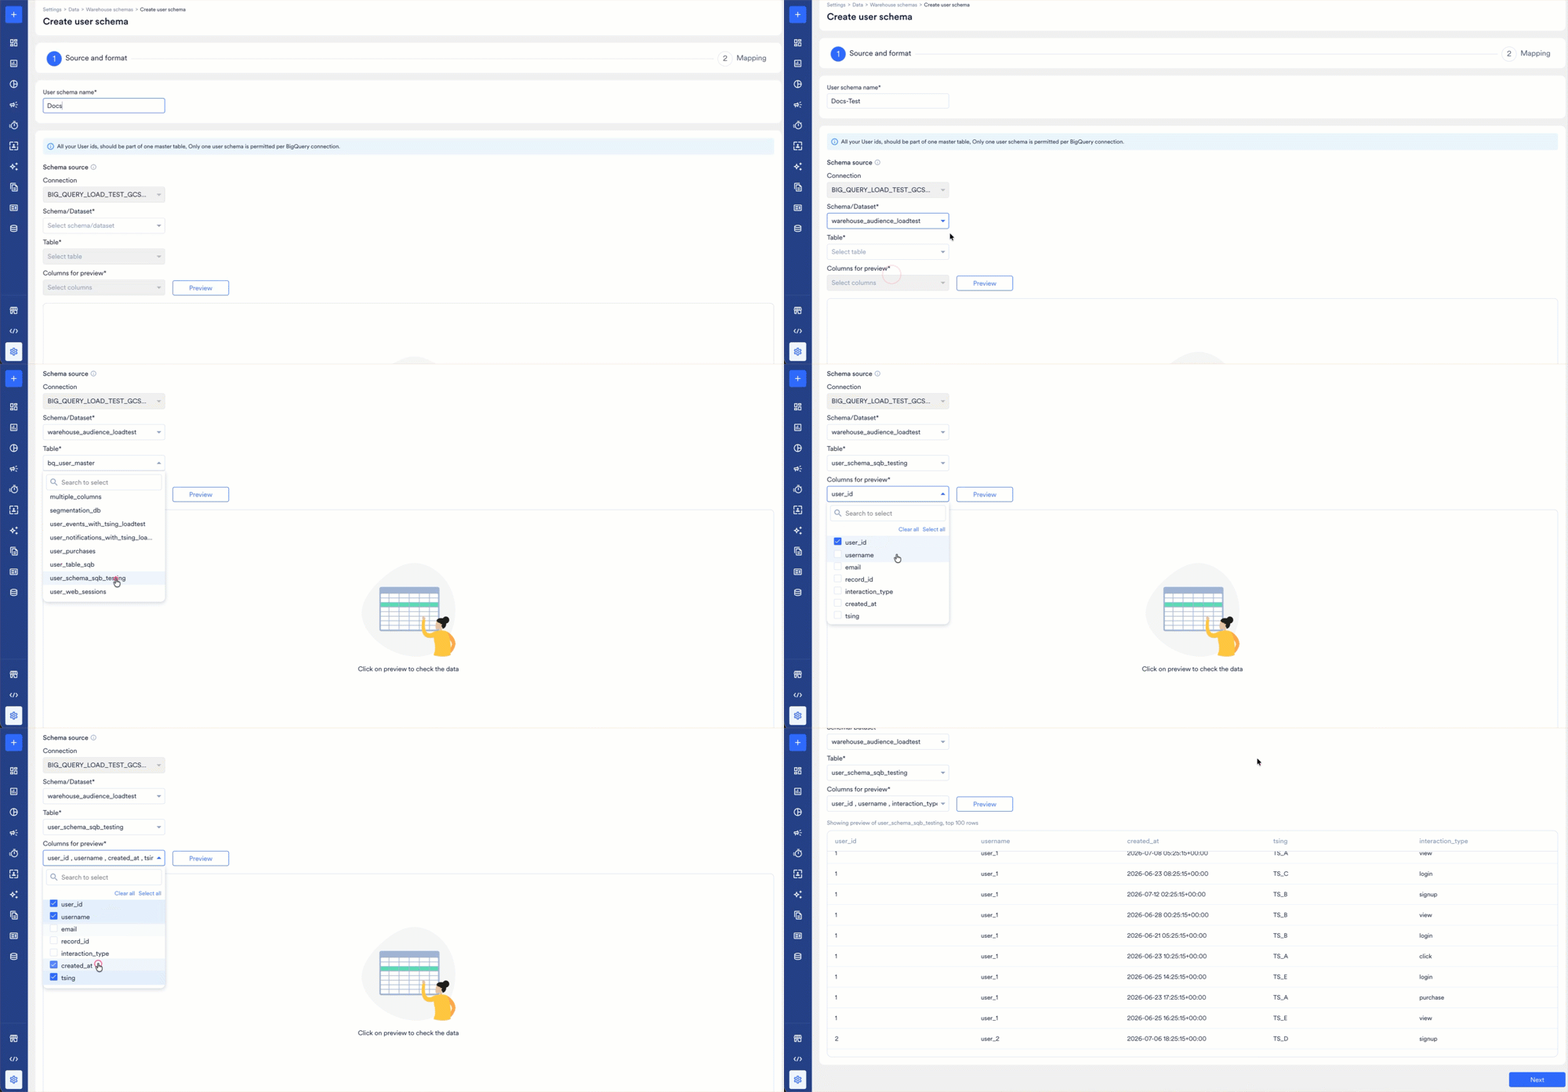
- User schema name: Enter a name for the schema. Use something recognisable, because this name identifies the schema on the Warehouse schema page and in error messages when a segment fails.
- Connection: This is pre-filled with the connection you opened the page for. Only one user schema is permitted per connection, so this cannot be changed here.
- Schema/Dataset: Select the schema or dataset that holds your user master table. On BigQuery, this is your dataset. The list is populated from the connection.
- Table: Select your user master table. The list is populated from the schema or dataset you selected. All the user IDs you want to segment on must be in this single table. MoEngage cannot combine user IDs from two tables, so pick the table that holds the complete set.
- Columns for preview: Select the columns you want to see in the preview. Select only the columns you need to recognise the table. Every preview runs a live query against your warehouse, so previewing columns you do not need costs you time and money. Select all is capped at the first 5,000 columns and is not recommended.
- Click Preview. MoEngage queries your warehouse and displays up to the top 100 rows for the columns you selected. Check the values before continuing. A preview that returns unexpected data usually means the wrong table was selected, which is far cheaper to fix now than after the mapping is done.
- Click Next. The Mapping step appears.
Step 2: Mapping
Next, tell MoEngage what each column means. Only the columns you map here appear in the segment builder.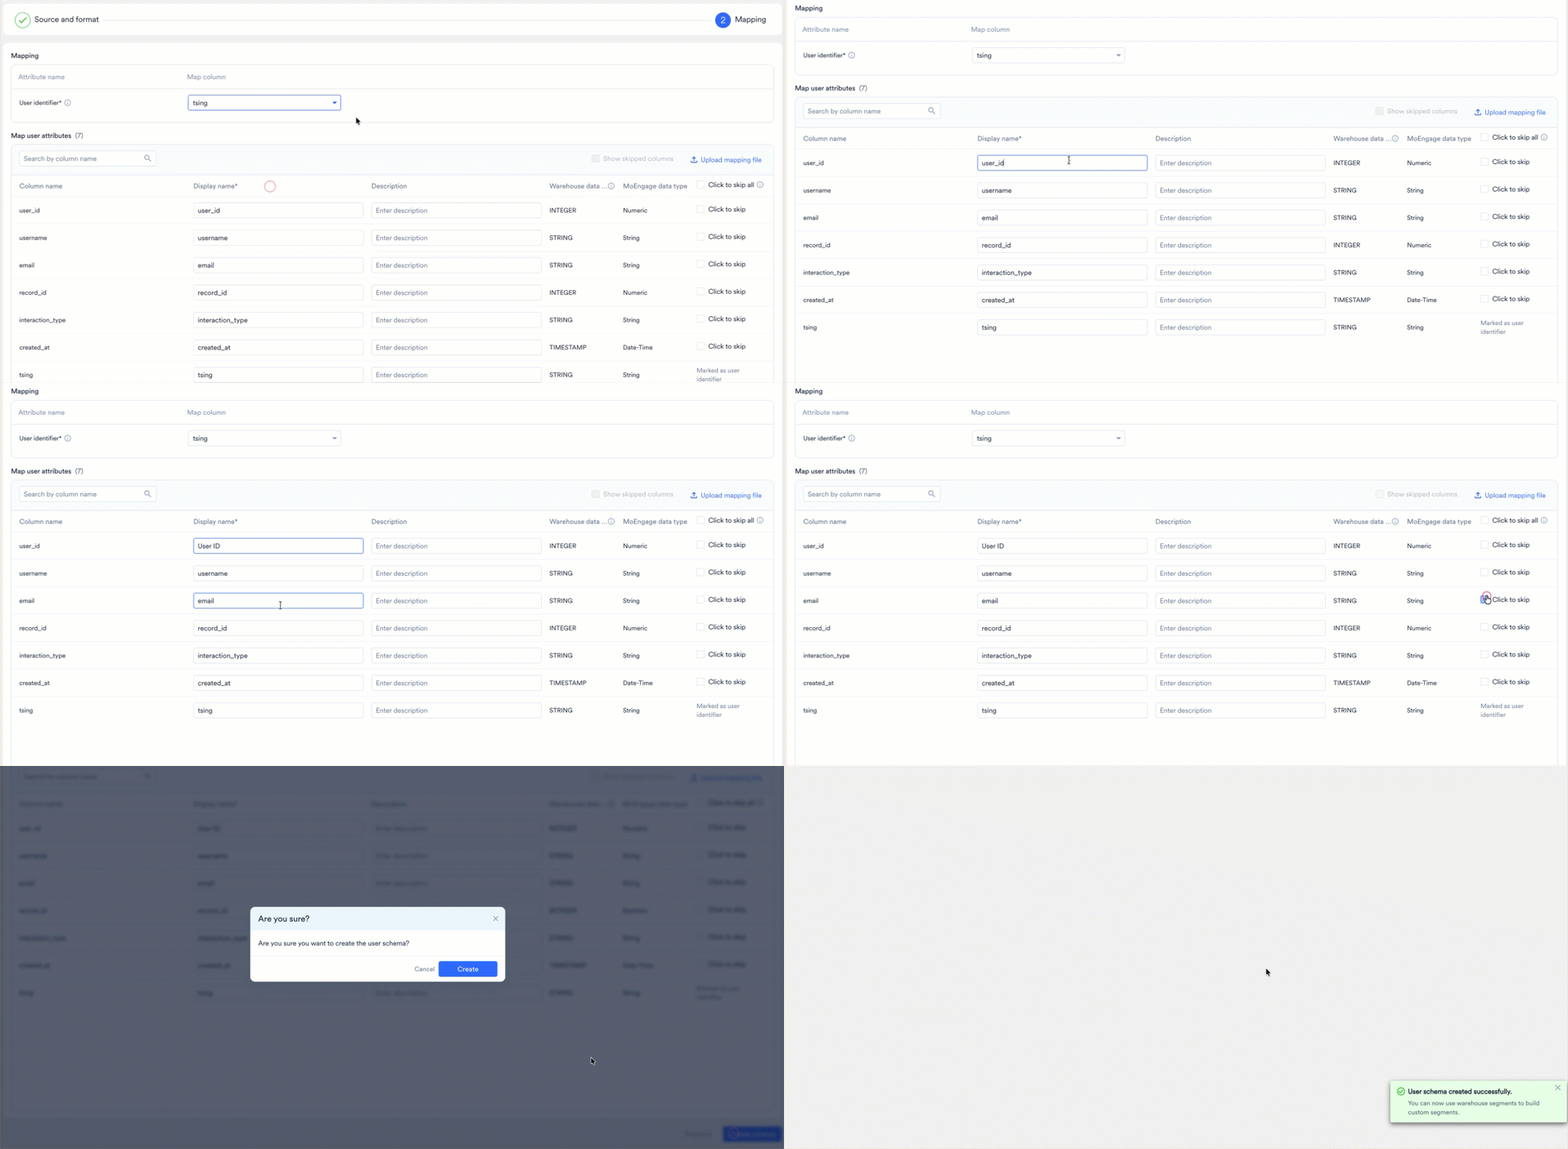
- User identifier: Select the column that holds your user ID. MoEngage matches the values in this column against the customer ID on existing MoEngage users, which is how a warehouse row becomes a targetable user. Only one column can serve as the user identifier. Composite identifiers made of two or more columns are not supported.
-
Under Map user attributes, configure each column you want to use in segmentation. The heading shows how many columns the table has. For each column, do the following:
- Display name: Required. Enter the name your marketers see in the segment builder. It defaults to the raw column name, which is rarely what a marketer would search for. Rename
usr_ltv_amttoLifetime Value,dob_dttoDate of Birth, andcust_city_nmtoCity. - Description: Optionally explain what the column holds. The description appears alongside the attribute in the segment builder, which reduces the number of questions that come back to your team.
- Warehouse data type: The column’s native data type as reported by your warehouse. This is read-only.
- MoEngage data type: The type MoEngage normalises it to. This is read-only, and it determines which operators are available for the attribute in the segment builder. For the full mapping, refer to Data Types.
- Click to skip: Select this checkbox to exclude the column. Skipped columns are not read and do not appear in the segment builder.
- Display name: Required. Enter the name your marketers see in the segment builder. It defaults to the raw column name, which is rarely what a marketer would search for. Rename
- To review the columns you excluded, select Show skipped columns. Skipped columns are hidden from the list by default.
- To map a large table without working through it column by column, click Upload mapping file and supply the mapping as a JSON file. For the file format, refer to Map Columns With a File.
- Click Create schema. MoEngage runs a validation query against your warehouse to confirm the user identifier column is non-null and unique. On success, MoEngage confirms that the user schema was created and that you can now use warehouse segments to build custom segments.
Columns whose data type MoEngage does not support show
-- as the MoEngage data type and are skipped automatically. You cannot map them. For the list of supported types, refer to Data Types.Create an Event Schema
An event schema points at a table of behavioral data, with one row per event occurrence and many rows per user. You can create as many event schemas as you have event tables. To create an event schema, perform the following steps:- On the sidebar menu in MoEngage, click Settings. The Settings page appears.
- Under Data, click Warehouse Schema. The Warehouse schema page appears.
-
Click + Event schema at the top right. If this is your first event schema for the connection, you can also click Create an event schema in the middle of the page. The Create event schema page appears.
 These options appear only after a user schema exists for the connection. Event schemas are joined to the user schema, so there is nothing to join against until it is created.
Step 1: Source and Format
First, point MoEngage at the event table and name the event your marketers will see.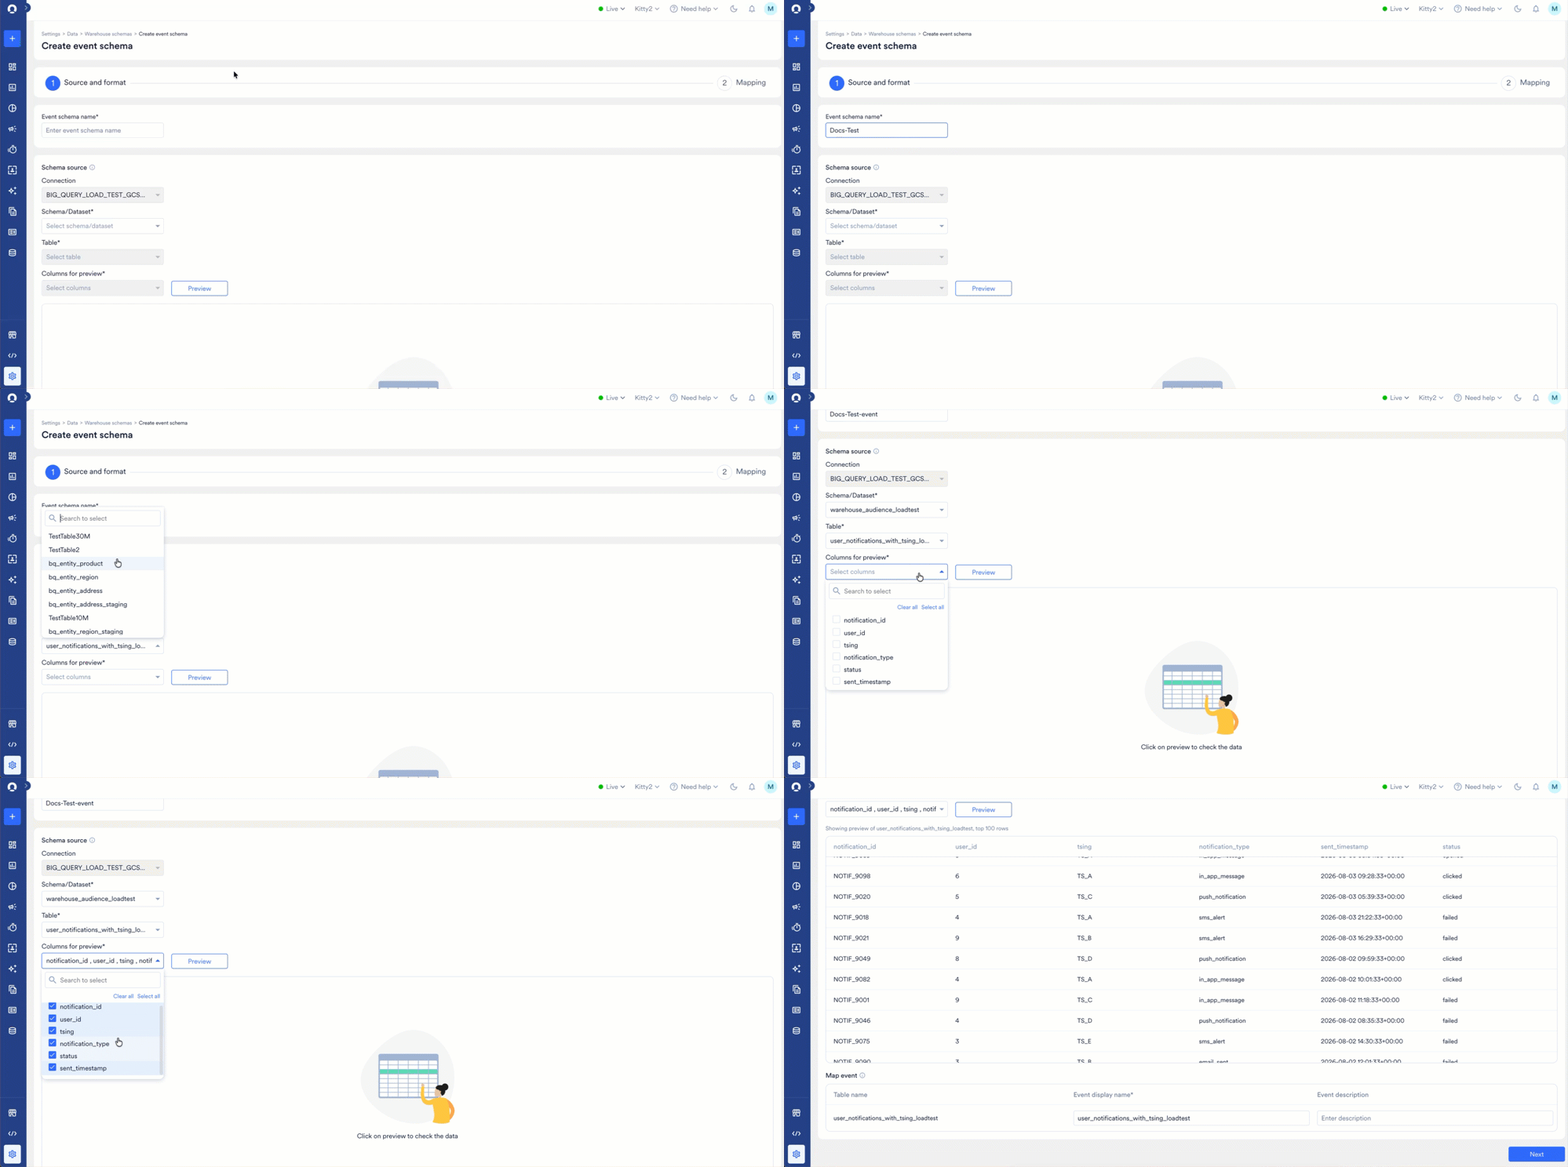
- Event schema name: Enter a name for the schema. This identifies the schema on the Warehouse schema page and in error messages when a segment fails.
- Connection: This is pre-filled with the connection you opened the page for.
- Schema/Dataset: Select the schema or dataset that holds your event table.
- Table: Select the event table. Tables already used in another schema appear greyed out and cannot be selected. A table can belong to one schema only, whether that is a user schema or an event schema.
- Columns for preview: Select the columns you want to see in the preview. Use Clear all to reset the selection. Select only the columns you need to recognise the table. Every preview runs a live query against your warehouse, so previewing columns you do not need costs you time and money. Select all is capped at the first 5,000 columns and is not recommended.
- Click Preview. MoEngage displays the rows returned, up to a maximum of 100.
-
Under Map event, give the table the event name it should be mapped to in MoEngage:
- Table name: The source table. This is read-only.
- Event display name: Required. Enter the name your marketers see when they select this event in the segment builder. It defaults to the table name, which is rarely what a marketer would look for.
bq_event_order_placed_stagingmeans nothing to them, whereasOrder Placeddoes. - Event description: Optionally explain what the event records. The description appears alongside the event in the segment builder.
One table maps to one event. You cannot map several events from a single table, so select a table whose rows all represent the same event. - Click Next. The Mapping step appears.
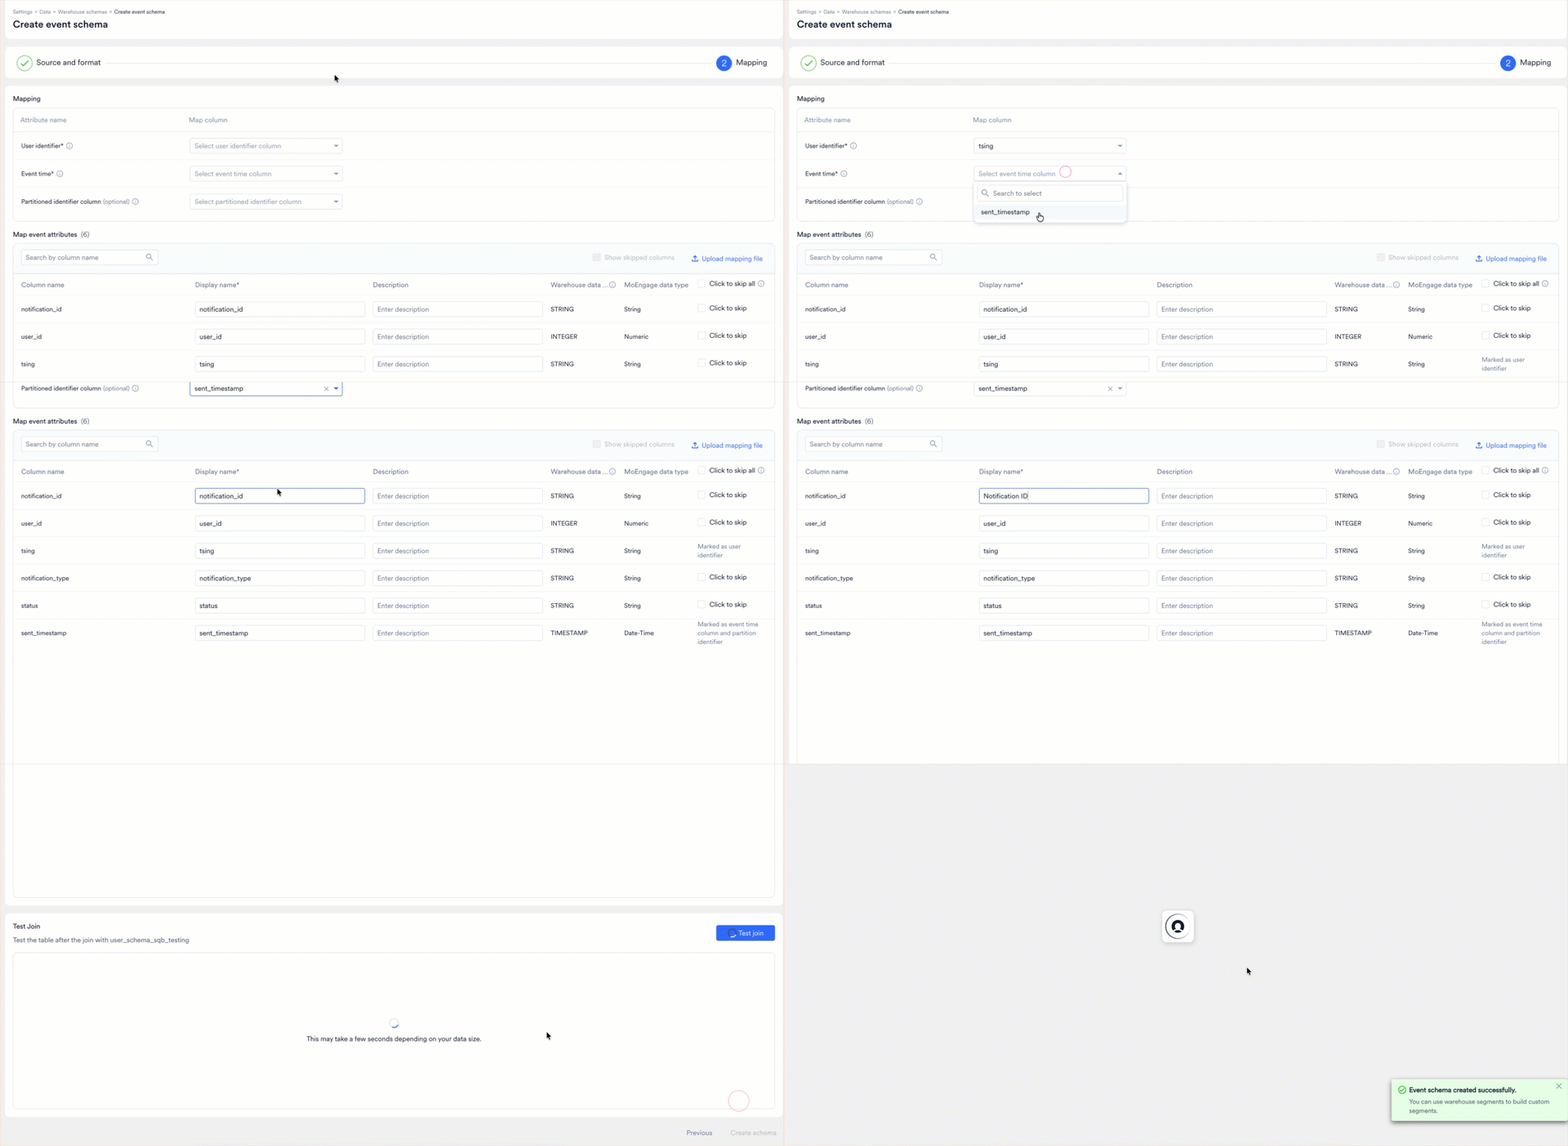
Step 2: Mapping
Next, tell MoEngage which column identifies the user, which column holds the event time, and what the remaining columns mean.- User identifier: Select the column in this table that uniquely identifies each user. This is what MoEngage uses to match rows in your warehouse to users in MoEngage, so the values must correspond to the user identifier in your user schema.
-
Event time: Select the column that records when the event happened. This must be a column that maps to the MoEngage Date-Time type, such as a
TIMESTAMPcolumn. - Partitioned identifier column: Optional. If your event table is partitioned, select the column it is partitioned on. MoEngage uses it to limit each query to the partitions it needs instead of scanning the whole table, which cuts the cost and time of every segment built on this event. This is often the same column as the event time. A column serving both roles is labelled accordingly in the attribute table below.
-
Under Map event attributes, configure each remaining column. The heading shows how many columns the table has. For each column, do the following:
- Display name: Required. Enter the name your marketers see in the segment builder.
- Description: Optionally explain what the column holds.
- Warehouse data type: The column’s native data type as reported by your warehouse. This is read-only.
- MoEngage data type: The type MoEngage normalises it to, which determines the operators available in the segment builder. This is read-only. For the full mapping, refer to Data Types.
- Click to skip: Select this checkbox to exclude the column.
- To map a large table without working through it column by column, click Upload mapping file and supply the mapping as a JSON file. For the file format, refer to Map Columns With a File.
-
Under Test Join, click Test join. MoEngage joins this table to your user master table on the user ID column and returns sample rows.
Test join stays disabled until you map the user identifier, because there is nothing to join on until then.
If the join returns nothing, MoEngage shows No rows returned and you cannot create the schema until it passes.
The join runs against your warehouse, so it can take a few seconds depending on the size of your data.The usual cause is mapping the wrong column as the user identifier. Event tables often carry more than one ID: an order or purchase ID that identifies the row, and a user ID that identifies the person. Only the user ID matches your user master table.
- Click Create schema, then click Create to confirm. The button stays disabled until the user identifier and event time are mapped and the test join passes.
Map Columns With a File
Mapping a wide table one row at a time is slow. On the Mapping step of either wizard, click Upload mapping file and supply a JSON file instead. This works the same way for user schemas and event schemas. The file holds amapping array with one object per column:
Two rules govern what happens to values you do not supply:
- Omit a field to leave its current value untouched. In the
LAST_NAMEexample above, the description keeps whatever it had. - Set a field to
nullor""to clear it. Use this to remove a display name or description you no longer want.
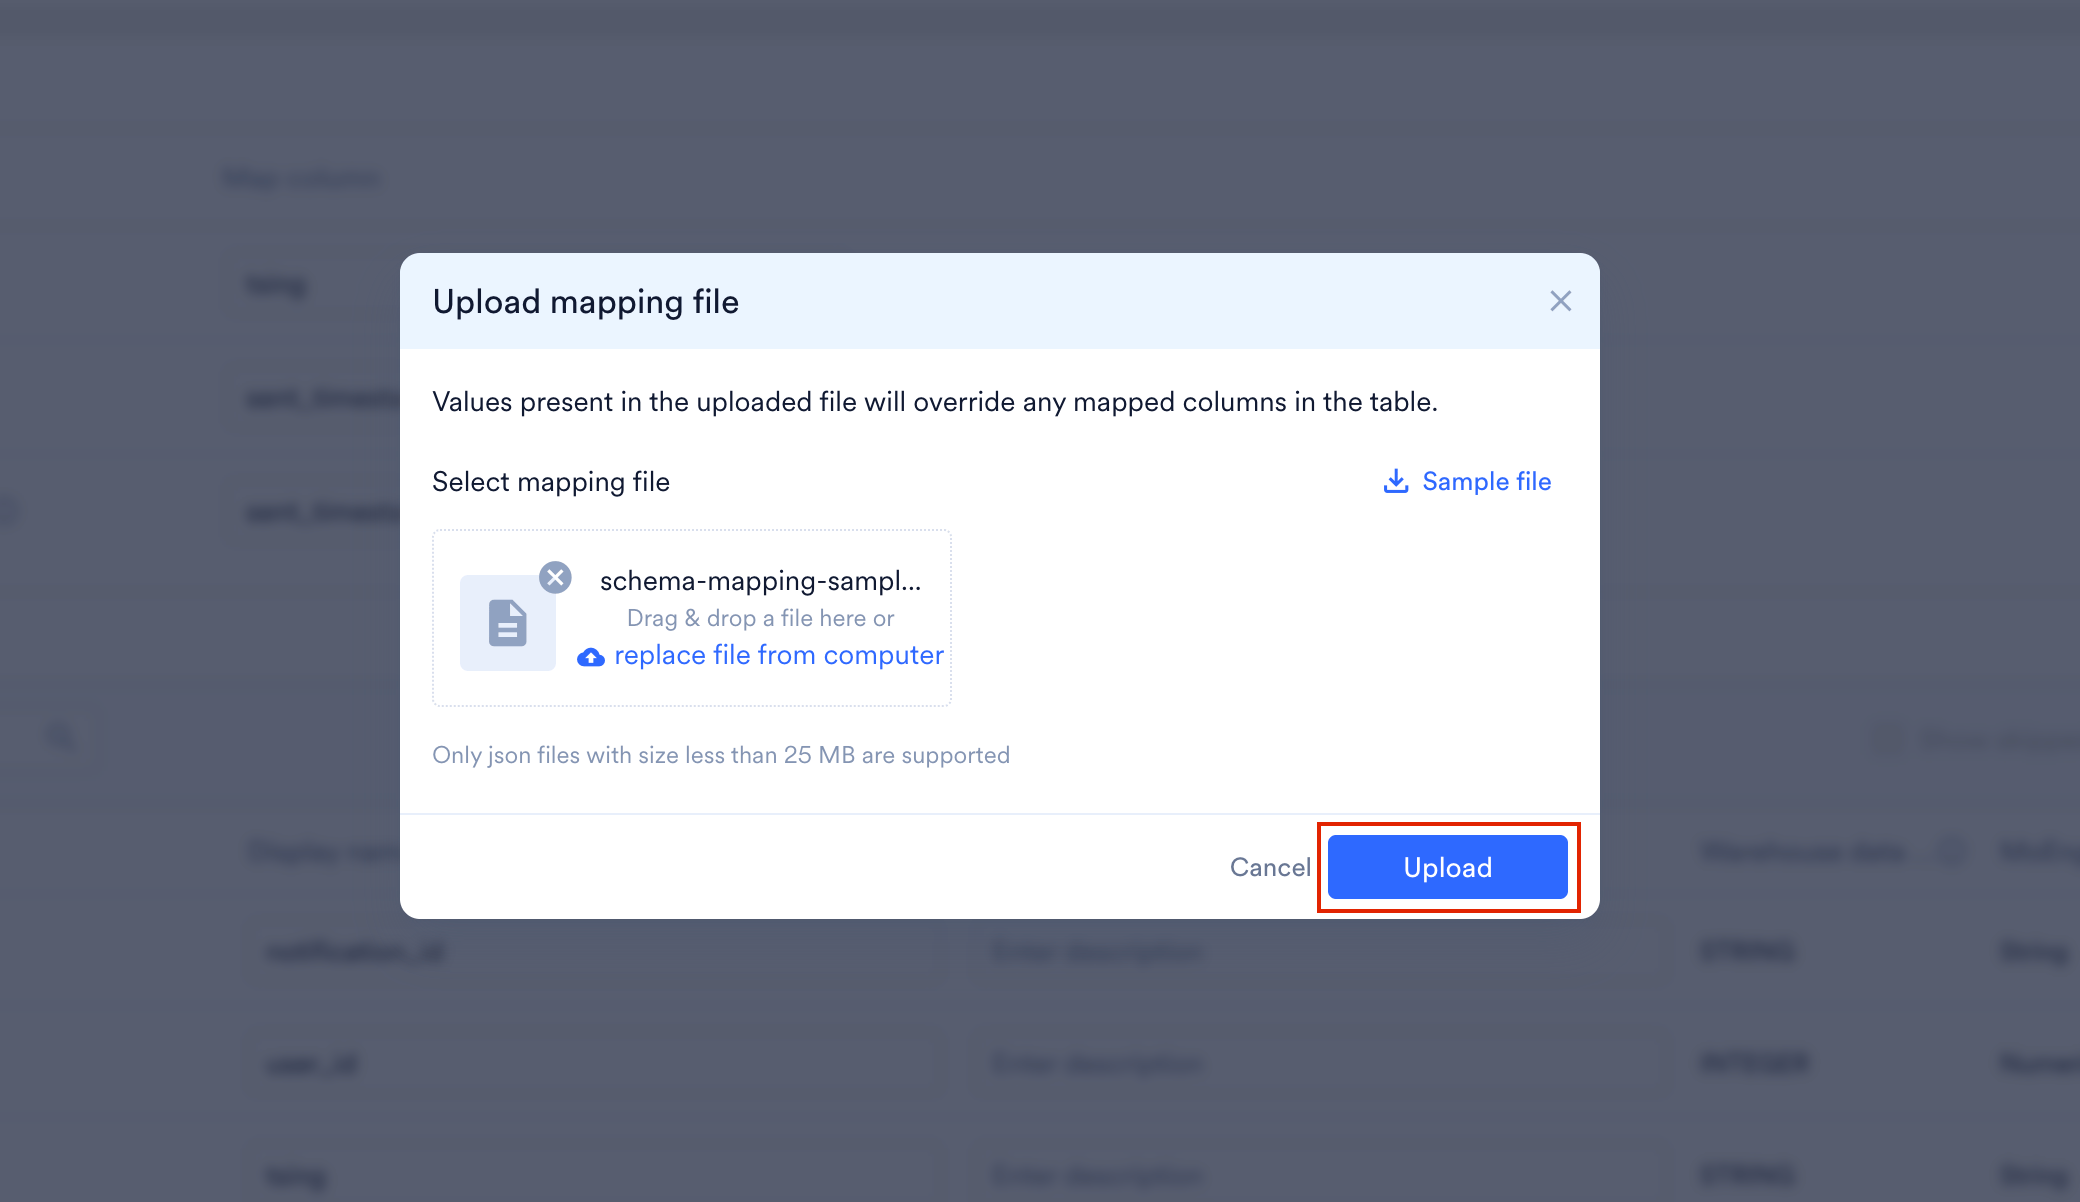
- On the Mapping step, click Upload mapping file. The Upload mapping file dialog appears.
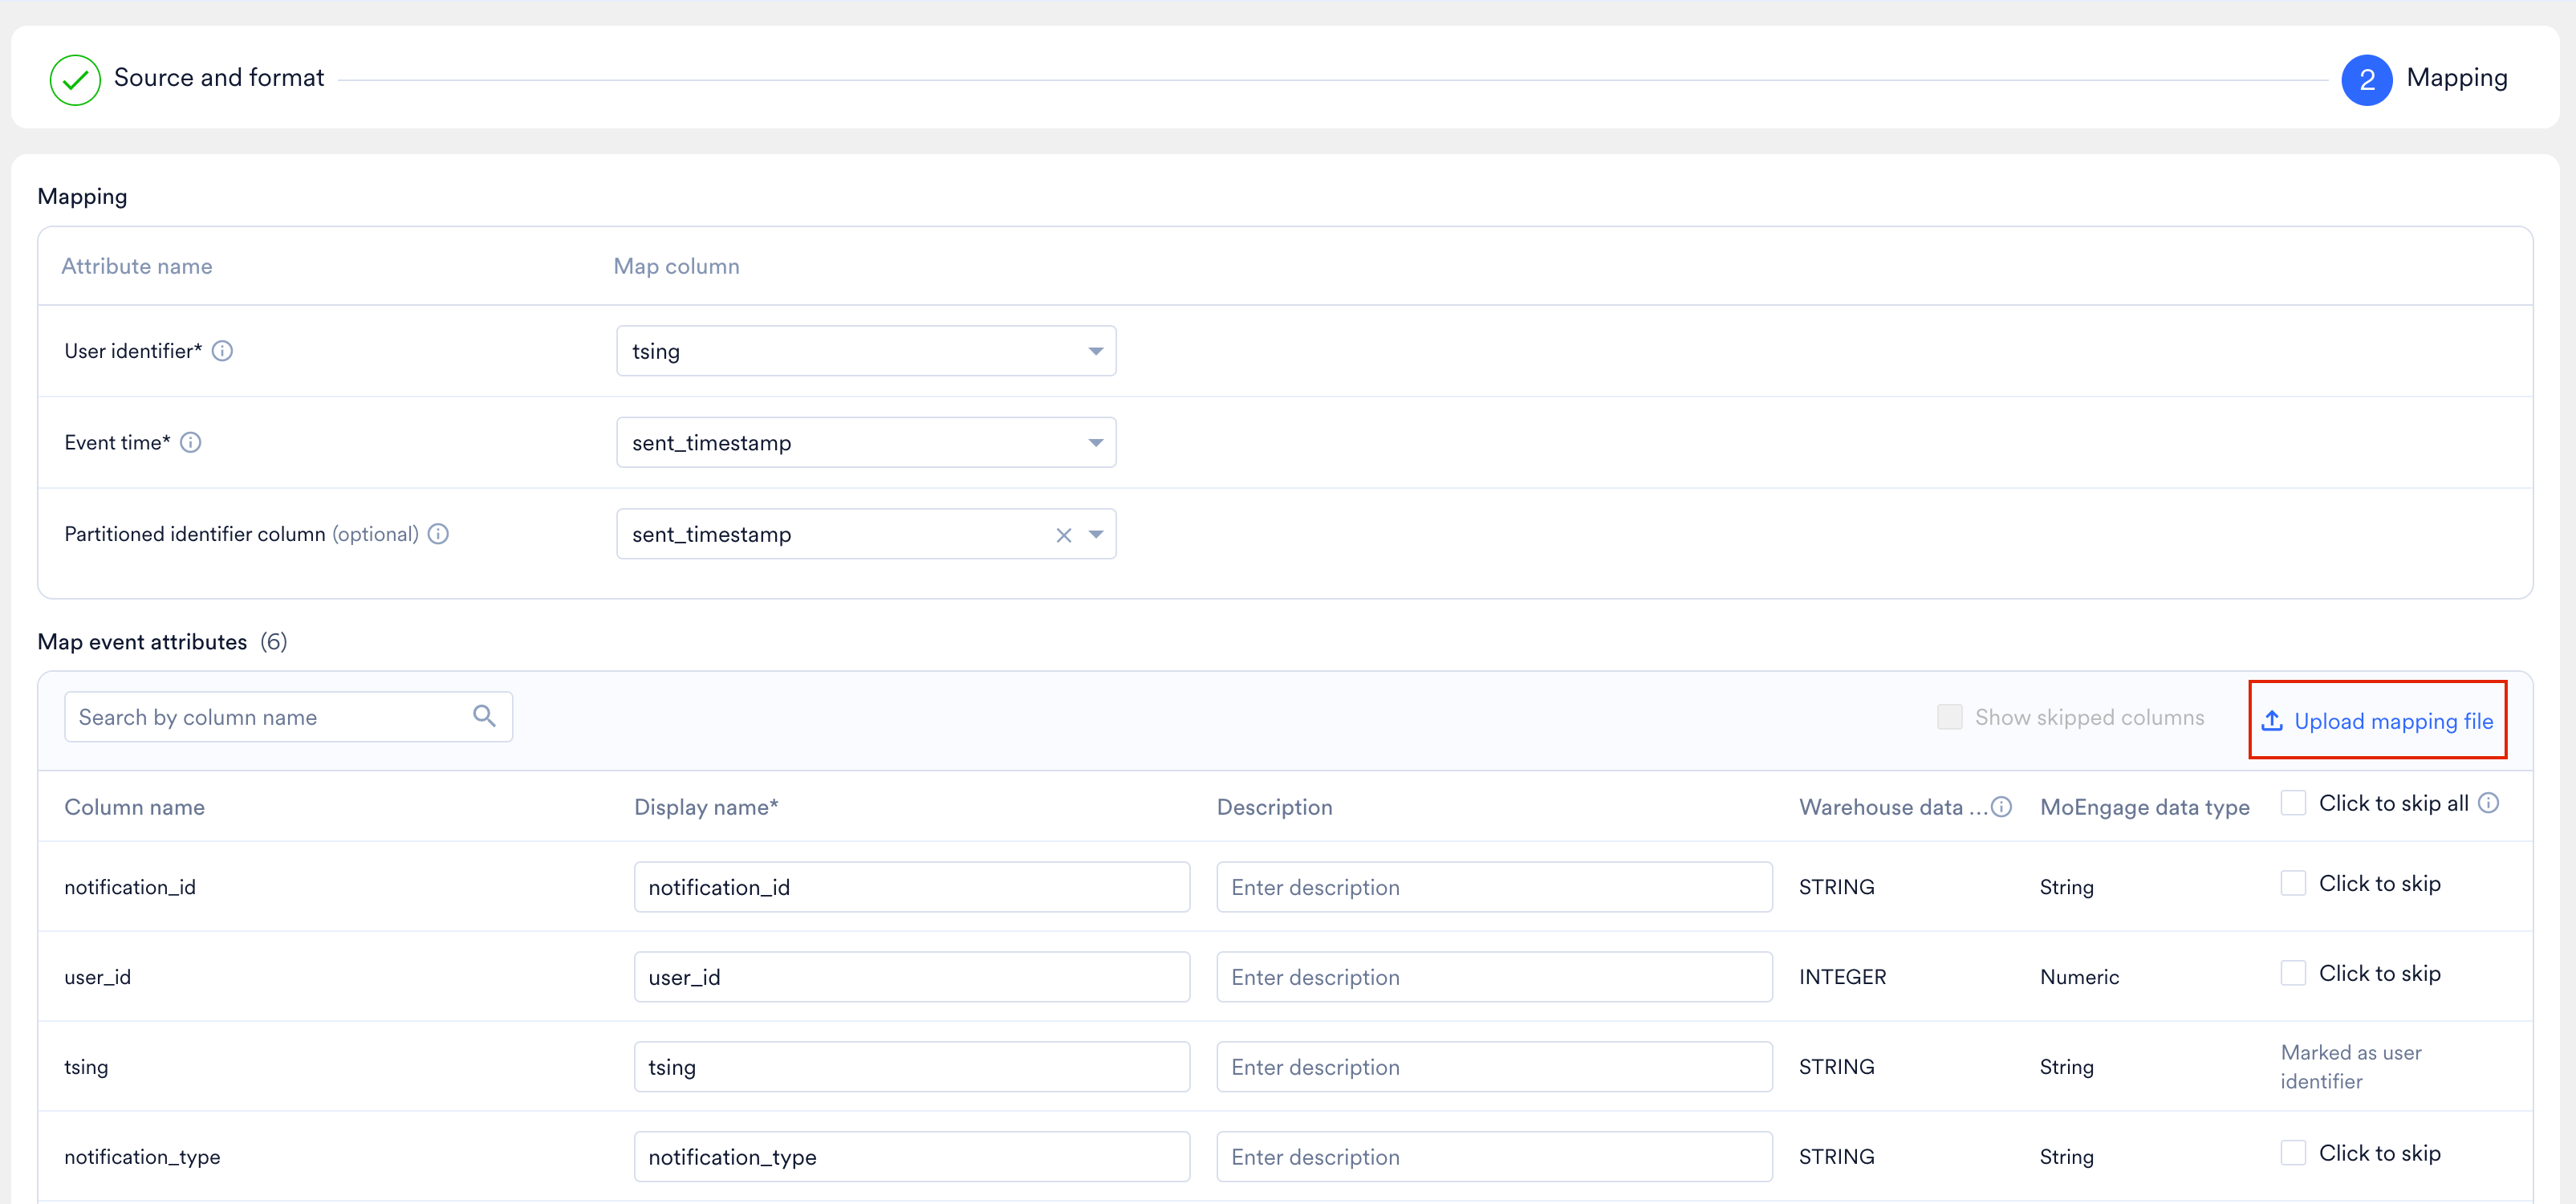
- To start from a template rather than writing the file yourself, click Sample file. MoEngage downloads a JSON file you can edit.
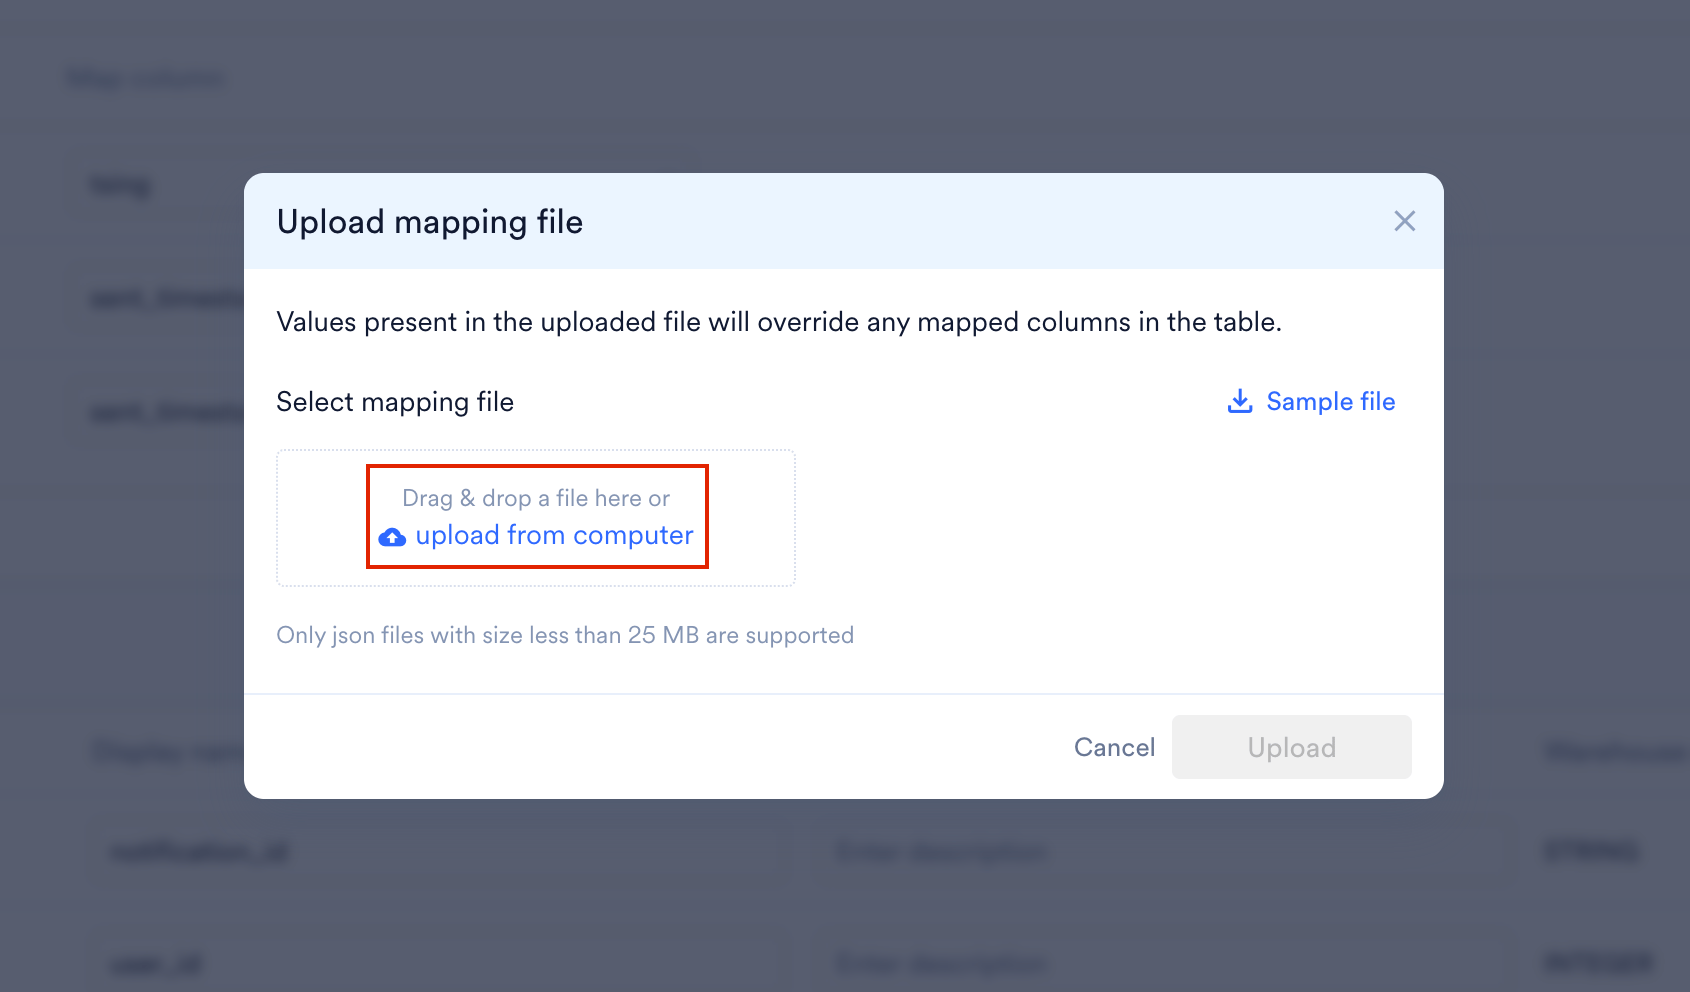
- Drag your file onto the dialog, or click upload from computer and select it. The file must be JSON and smaller than 25 MB.
- Click Upload.
Keep Schemas in Sync
MoEngage reads your warehouse metadata on a schedule rather than live. The metadata covers databases, tables, and columns. Exploring a large warehouse on every page load is slow and runs up query costs on your side, so the metadata is cached. Metadata refreshes automatically every 6 hours. A table or column you create now appears in MoEngage within that window. To pick it up sooner, use Force refresh, which re-reads the metadata in the background. New columns are never mapped for you. Until you map a column or mark it as skipped, it does not appear in the segment builder. Use the Show unmapped columns filter on the mapping screen to see only the columns still waiting on a decision.Manage Your Schemas
The Warehouse schema page lists the schemas for one connection at a time. Select the connection from the dropdown beside the page title.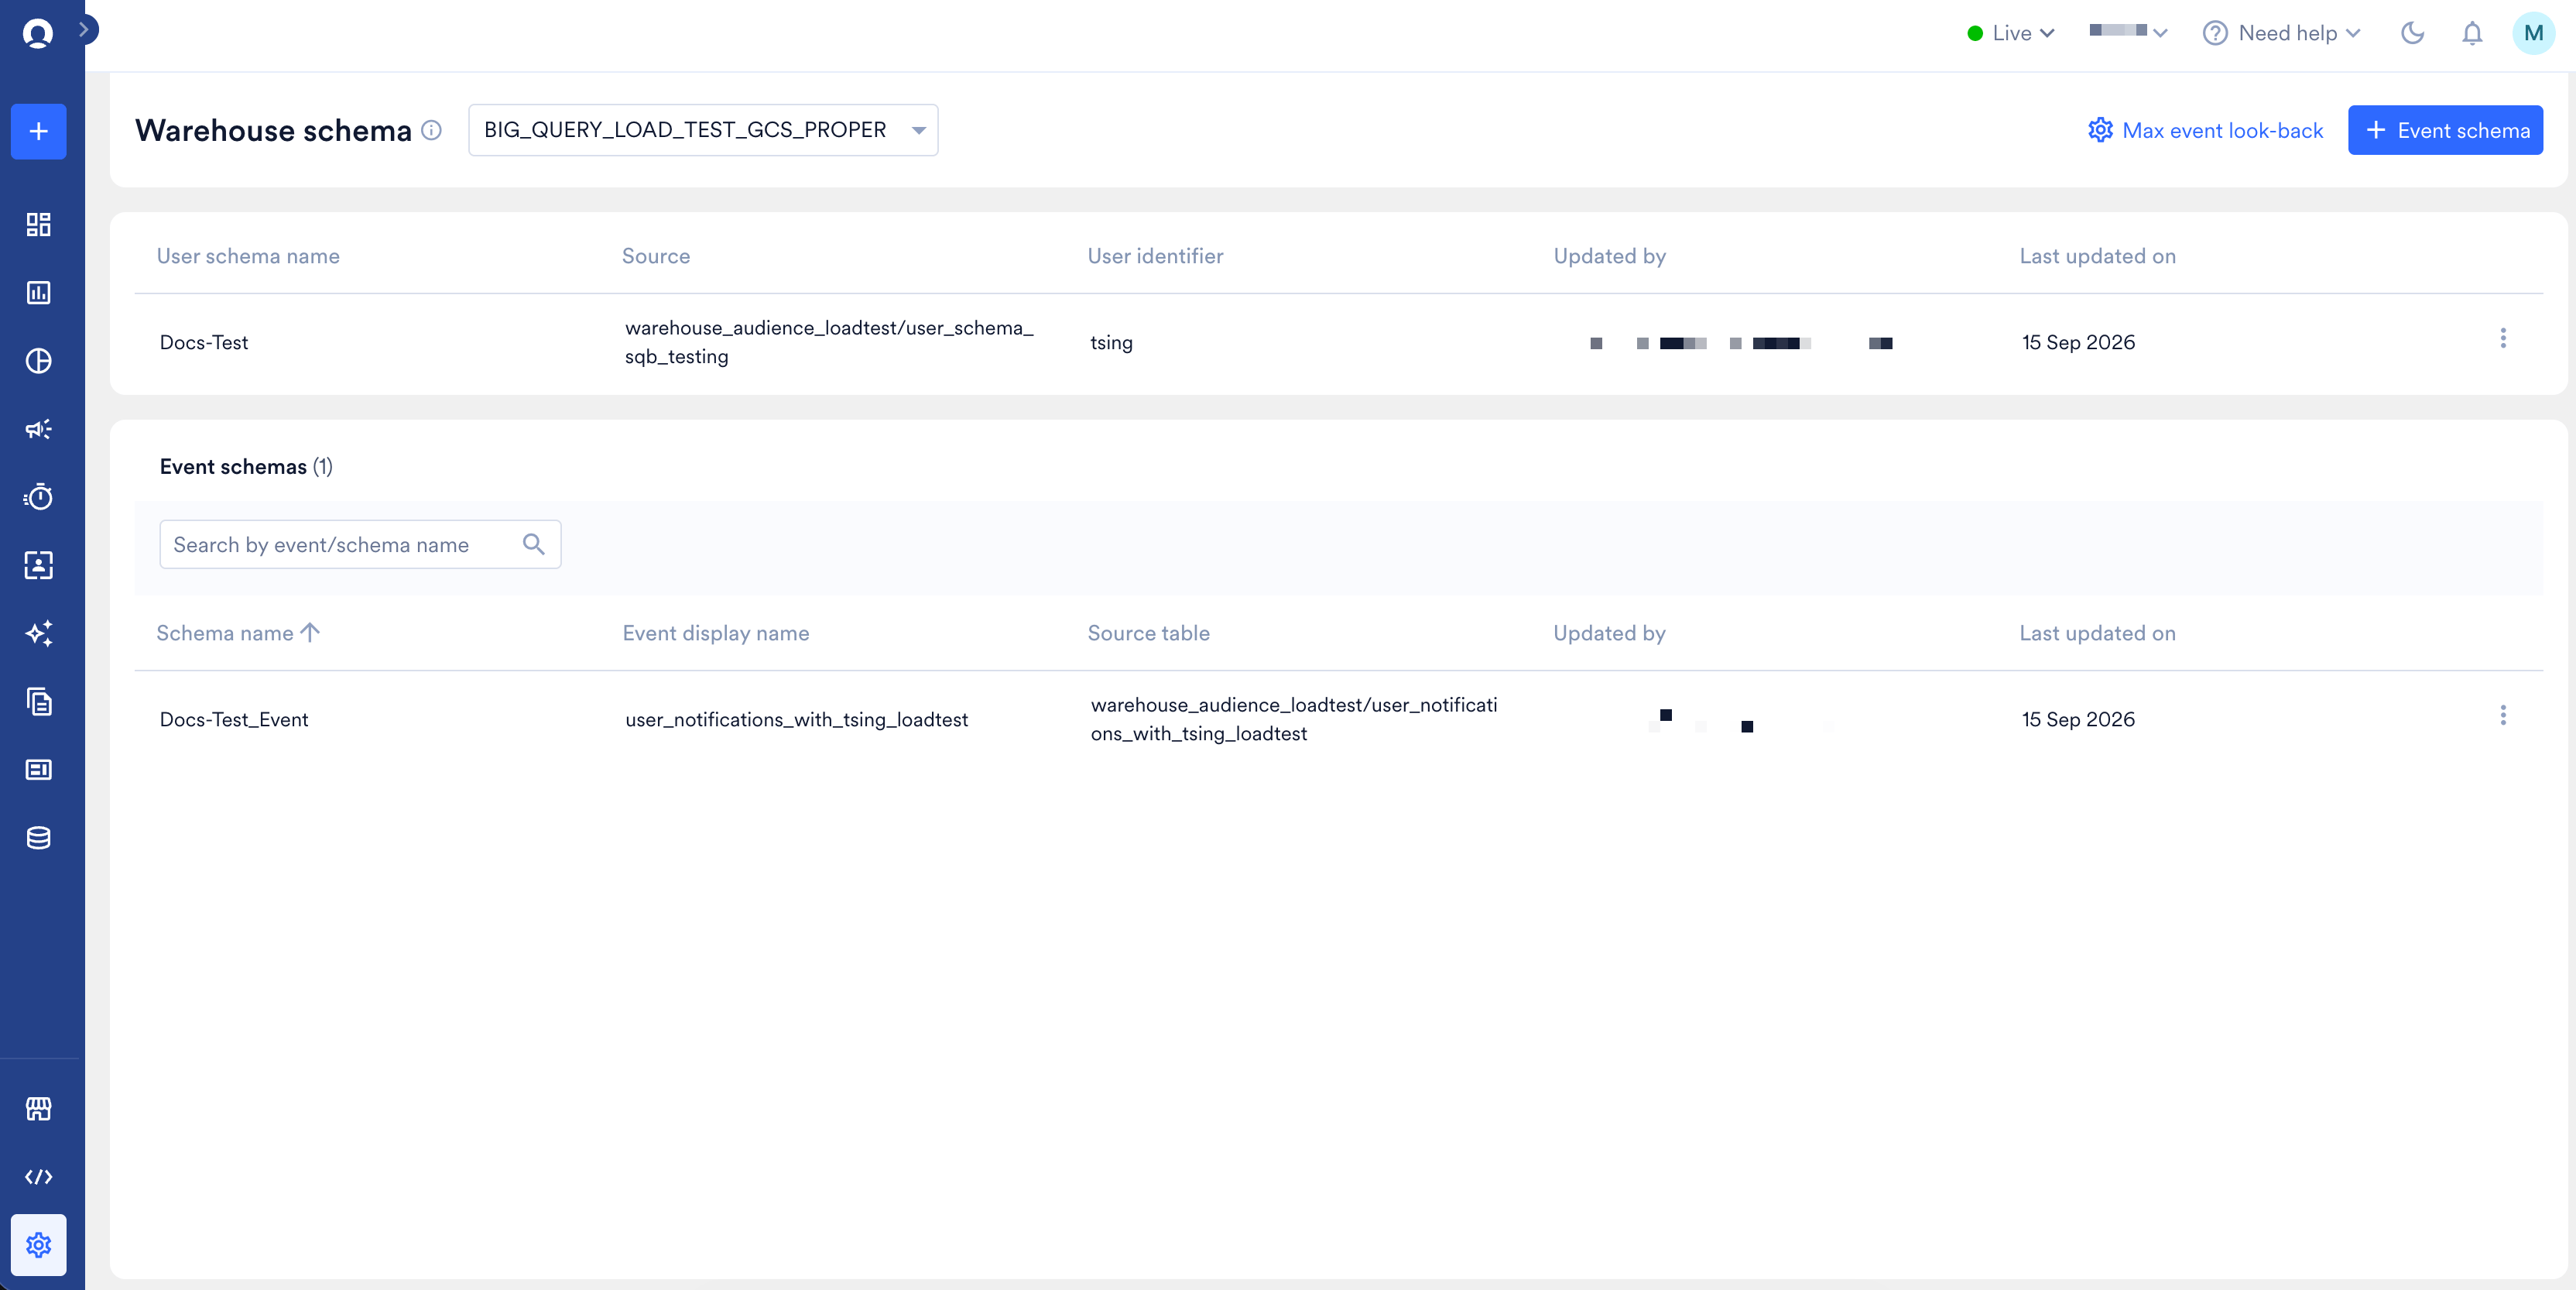
- The user schema for that connection, showing the schema name, source, user identifier, who last updated it, and when.
- Event schemas, showing the schema name, event display name, source table, who last updated it, and when. Use the search box to find a schema by event or schema name, or sort by schema name.
View a Schema
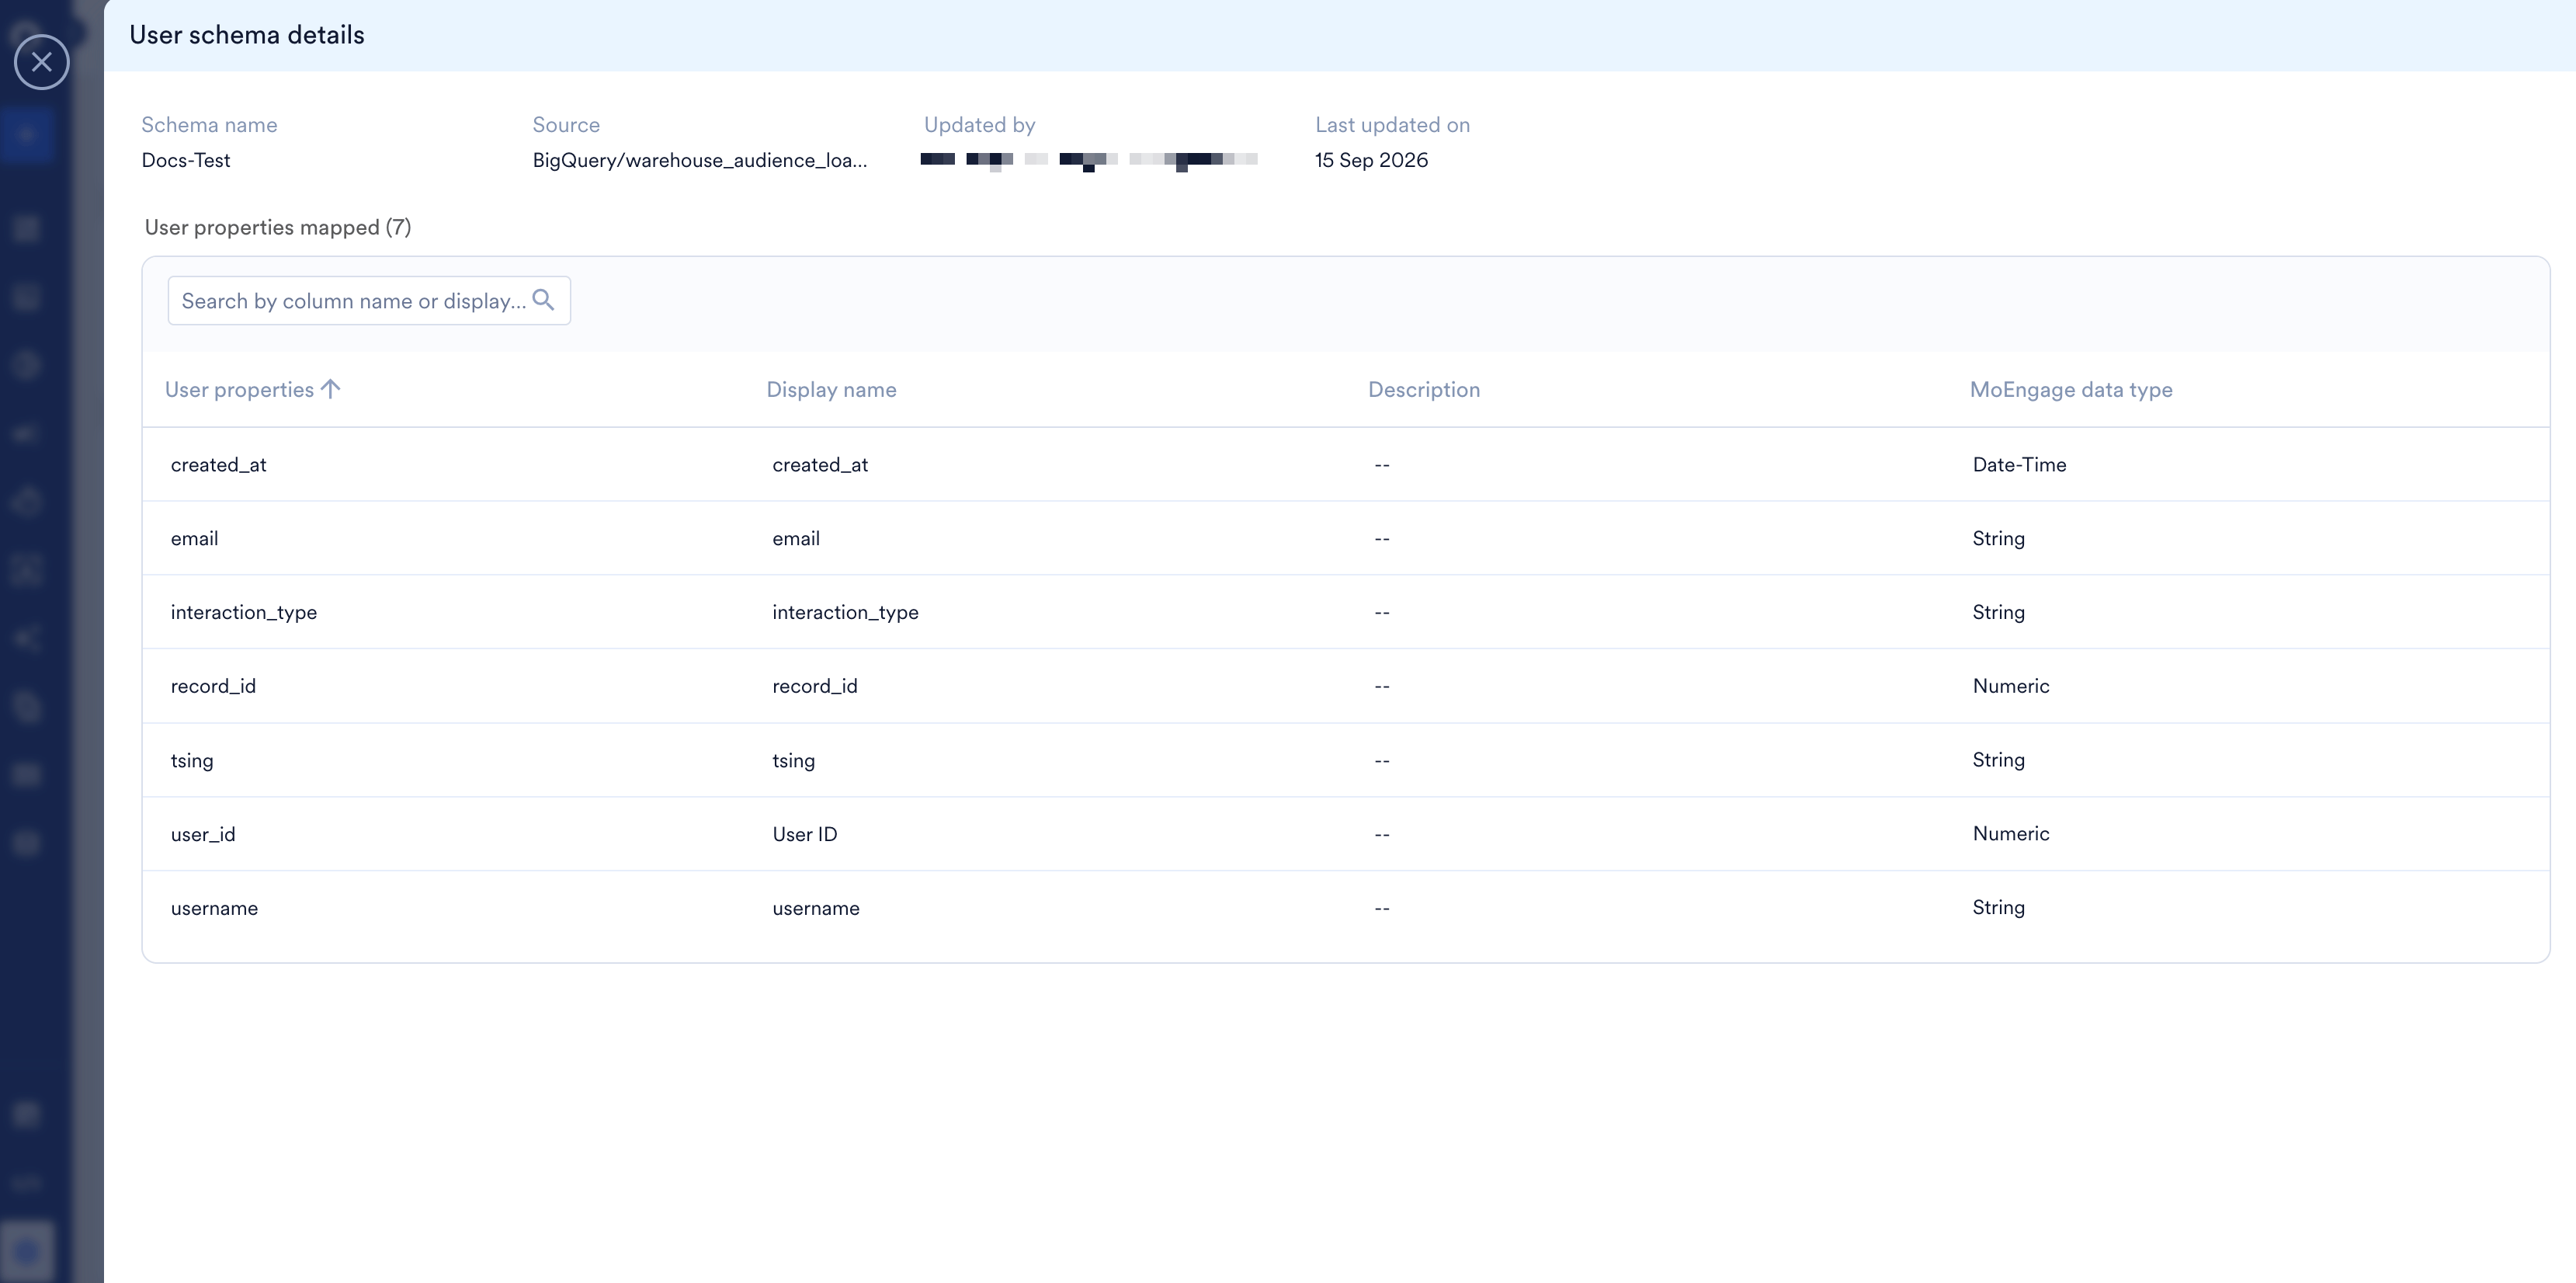
View opens a read-only panel showing the schema name, source, event display name and description, who last updated it, and when. Below that, User properties mapped or Event attributes mapped lists everything in the schema with its display name, description, and MoEngage data type. Use it to check what your marketers see without opening the edit flow. Entries without a description show--.
Edit a Schema
Edit reopens the two-step wizard with Update schema in place of Create schema. What you can change depends on the field:
The structural fields are locked because changing them would rewrite the queries behind every segment built on the schema. If you need a different table or a different user identifier, delete the schema and create it again.
Delete a Schema
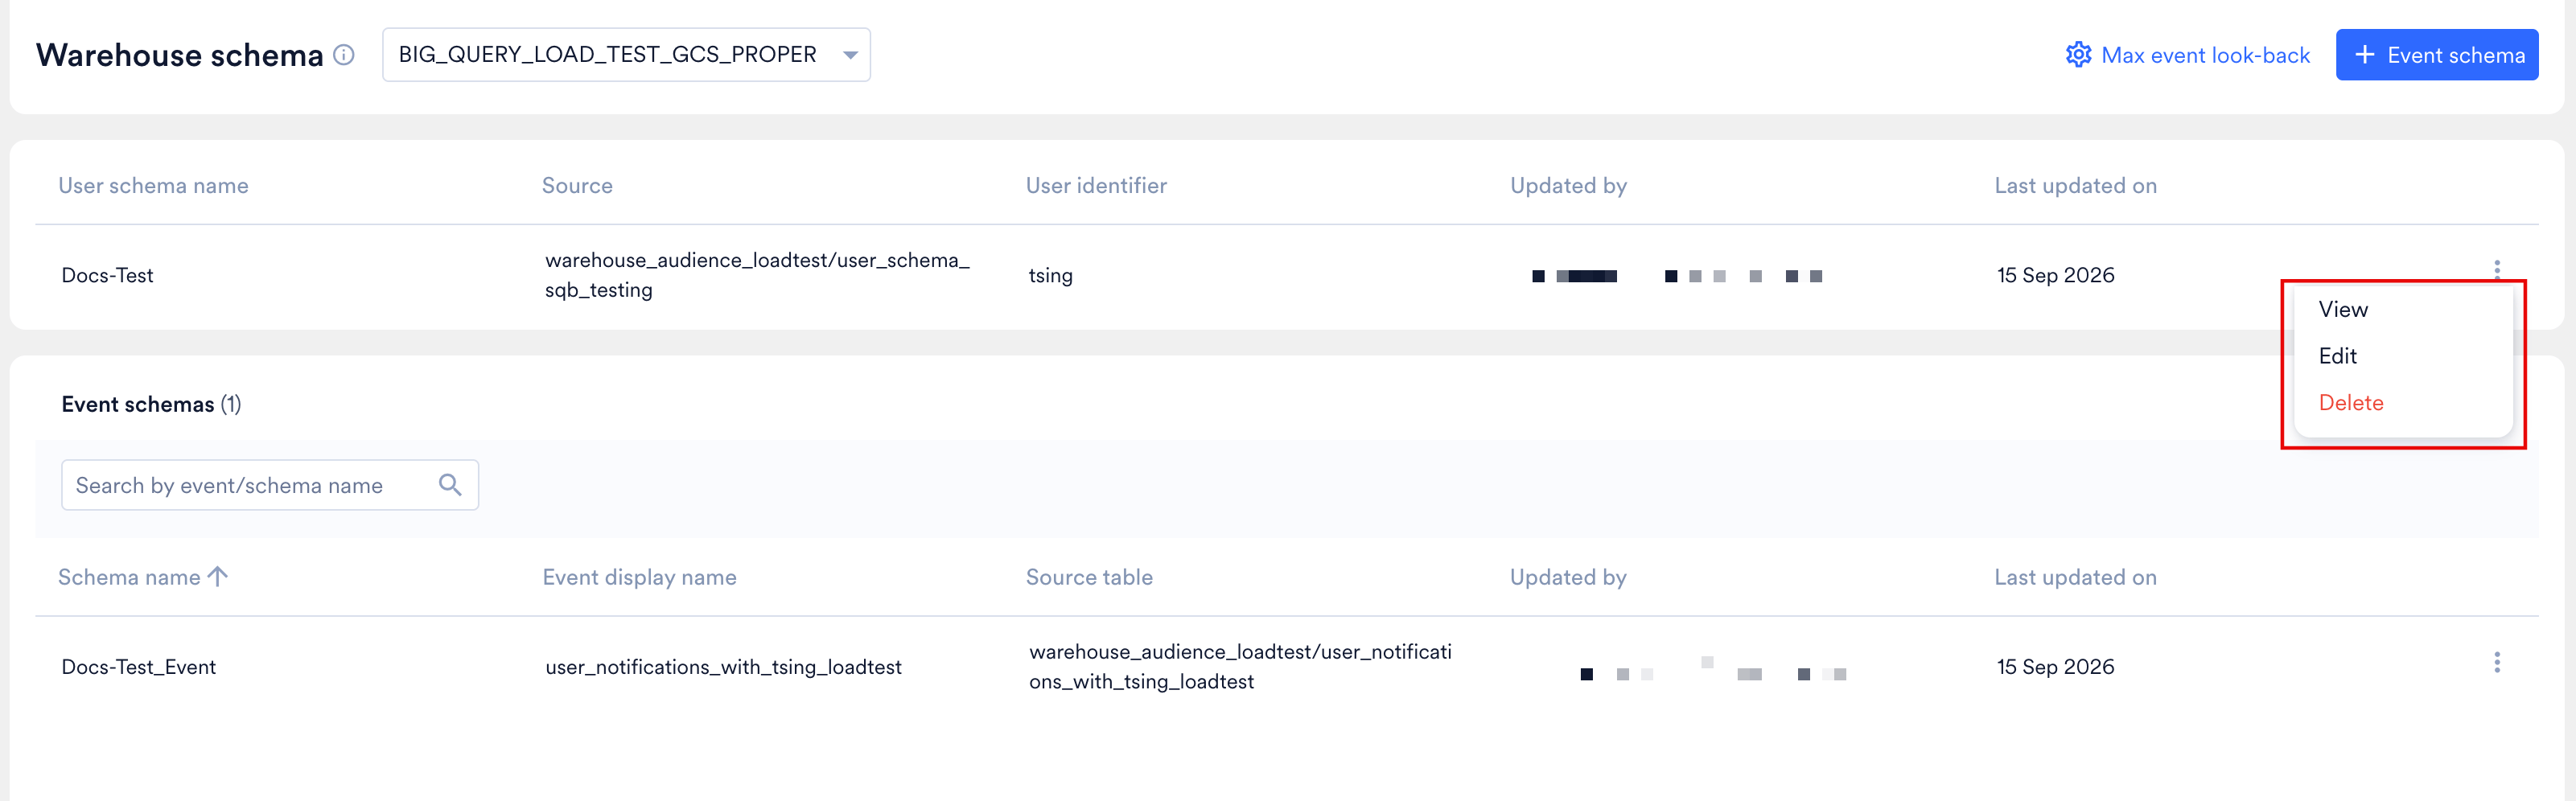
Delete a schema from the ellipsis menu on its row. Deleting the user schema removes everything for that connection, including every event schema built on it, because events are matched to users through the user schema. To confirm, typeDELETE in capitals.
Deleting a schema breaks everything built on it. Segments that depend on it start failing, and campaigns using those segments break with them.
When a Schema Change Breaks a Segment
A segment built on a warehouse schema depends on the underlying table staying as it was mapped. Rename a column, drop a table, or change a data type, and the query MoEngage generates no longer runs. The same happens if the connection is deleted. To check whether a segment still works, open it and run it. A segment that fails to return a count is broken. To fix it, correct the mapping in Settings > Data > Warehouse Schema, then run the segment again. Because nothing warns you, coordinate warehouse changes with whoever owns your MoEngage segments. Renaming a column your marketers depend on is silent until a campaign misses its audience.Limits
Schema limits are configurable. To raise them, contact MoEngage Support.
Permissions and Audit Logs
The Admin and Developer roles include warehouse schema access by default. To give another role access, or to take it away from one that has it, use custom roles. Creating, updating, and deleting user and event schemas is recorded in audit logs. Changes to the warehouse connection itself are outside this scope.Data Types
Warehouses use far more data types than MoEngage needs. Each column is normalized to a MoEngage data type, and that type determines which operators are available for the attribute in the segment builder. The mapping screen shows both types side by side, so you can check them before you publish.
Warehouse types shown above are BigQuery names. Equivalent types on other warehouses normalize the same way.
VARCHAR, CHAR, and TEXT columns all become a MoEngage String.
Unsupported Data Types
Columns of these types cannot be mapped. They show-- as the MoEngage data type and are skipped automatically.
If a column you need is unsupported, cast it to a supported type in a view in your warehouse and map the view instead.