

Custom Connectors are only supported in the SMS channel.
- Navigate to Settings -> Channels -> SMS.
- Click the Sender Configuration tab. You’ll find the list of integrated and custom service providers here.
- Click +Add Sender at the top right corner. In the Add Sender screen, you can either add a new custom service provider or a sender to a configured service provider.
- Click +Add custom service provider.
- Fill in the following details in the General Details screen:
Field Description Mark as default Turn on this toggle to mark the sender as the default sender for the service provider being configured. If marked as default, this sender would be used for sending all SMS campaigns from MoEngage unless you select a different sender while creating the campaign. Service provider name This field identifies the service provider you are configuring on the MoEngage Dashboard and has to be unique. Type the name of the connector here. Sender name This field identifies the Sender. Type the name of the sender here. Sender type The Sender type can either be Promotional or Transactional. Choose the Sender type as Promotional when you would be using the Sender for sending information about your brand, promoting deals, or engaging with users. Choose the Sender type as Transactional when you would be using the Sender for sending alerts about transactions, OTPs, security information, or any information that can be classified as transactional in nature. API URL This field contains information about the URL that should be used to send an API request to the Sender. You can get this information from the API Documentation of the Sender. Type the API Endpoint of the sender here. Method Select one of the following HTTP Methods as per the specifications mentioned in the API Documentation of the Sender: - GET
- POST
- DELETE
- Every service provider should have a distinct domain.
- For the GET and POST methods, you can personalize attributes. For more information, refer to Personalize SMS Campaign Content.
URL Parameters Add the URL Parameters to be passed to the API as Key-Value pairs using this option. You can get this information from the API Documentation of the Sender. For example, if the API URL call uses the GET method, all the parameters, such as API Key, Authorization, and so on, are passed as URL Parameters.
Note: For the GET and POST methods, you can personalize attributes. For more information, refer to Personalize SMS Campaign Content.Headers Add the URL Parameters to be passed to the API as Key-Value pairs using this option. You can get this information from the API Documentation of the Sender. For example, if the API URL call uses the GET method, all the parameters, such as API Key, Authorization, and so on, are passed as URL Parameters. Note: For the GET and POST methods, you can personalize attributes. For more information, refer to Personalize SMS Campaign Content. Body Type Choose one of the following when the POST method is used to send information as part of the API request. This information can be found in the API Documentation of the Sender. - Form: Add Key-Value pairs for this request type.
- JSON: Add Key-Value pairs for this request type.
- Raw: Paste the request body for this request type.
Enable authentication settings If your connector request involves a basic, non-changing access token, you can simply add those as a key-value pair in the header.
If your connector request involves an OAuth 2.0 authentication, perform the following steps:
- Turn on the Enable authentication settings toggle.
- From the Select authorization setting drop-down list, select an OAuth configuration.
- You can see the OAuth settings configured in the MoEngage system at Settings > Advanced settings > Authorization configuration. For more information, refer to OAuth 2.0.
- You must select a healthy OAuth setting, which is in “Active” status. If you select an OAuth setting in “Failed” status, you cannot create a Connector campaign.
- The Key field is populated as “Authorization” by default.
- In the Prefix field, enter a prefix. You can enter the name of a prefix added in the selected OAuth configuration. You can also override those prefixes and create your own prefix.
- In the Reattempt error codes field, enter error codes to initiate a reattempt in case of a failed response. For example, use the error code “400” for the expired error code to inform MoEngage to reattempt creating a Connector campaign.
Send test SMS Click Send test SMS to verify your configuration. The Send Test SMS screen has the following fields: - Mobile Number: Select the Country Code from the dropdown and type the mobile number in the textbox. The Test SMS will be sent to this number.
- Message: This field denotes the message body.
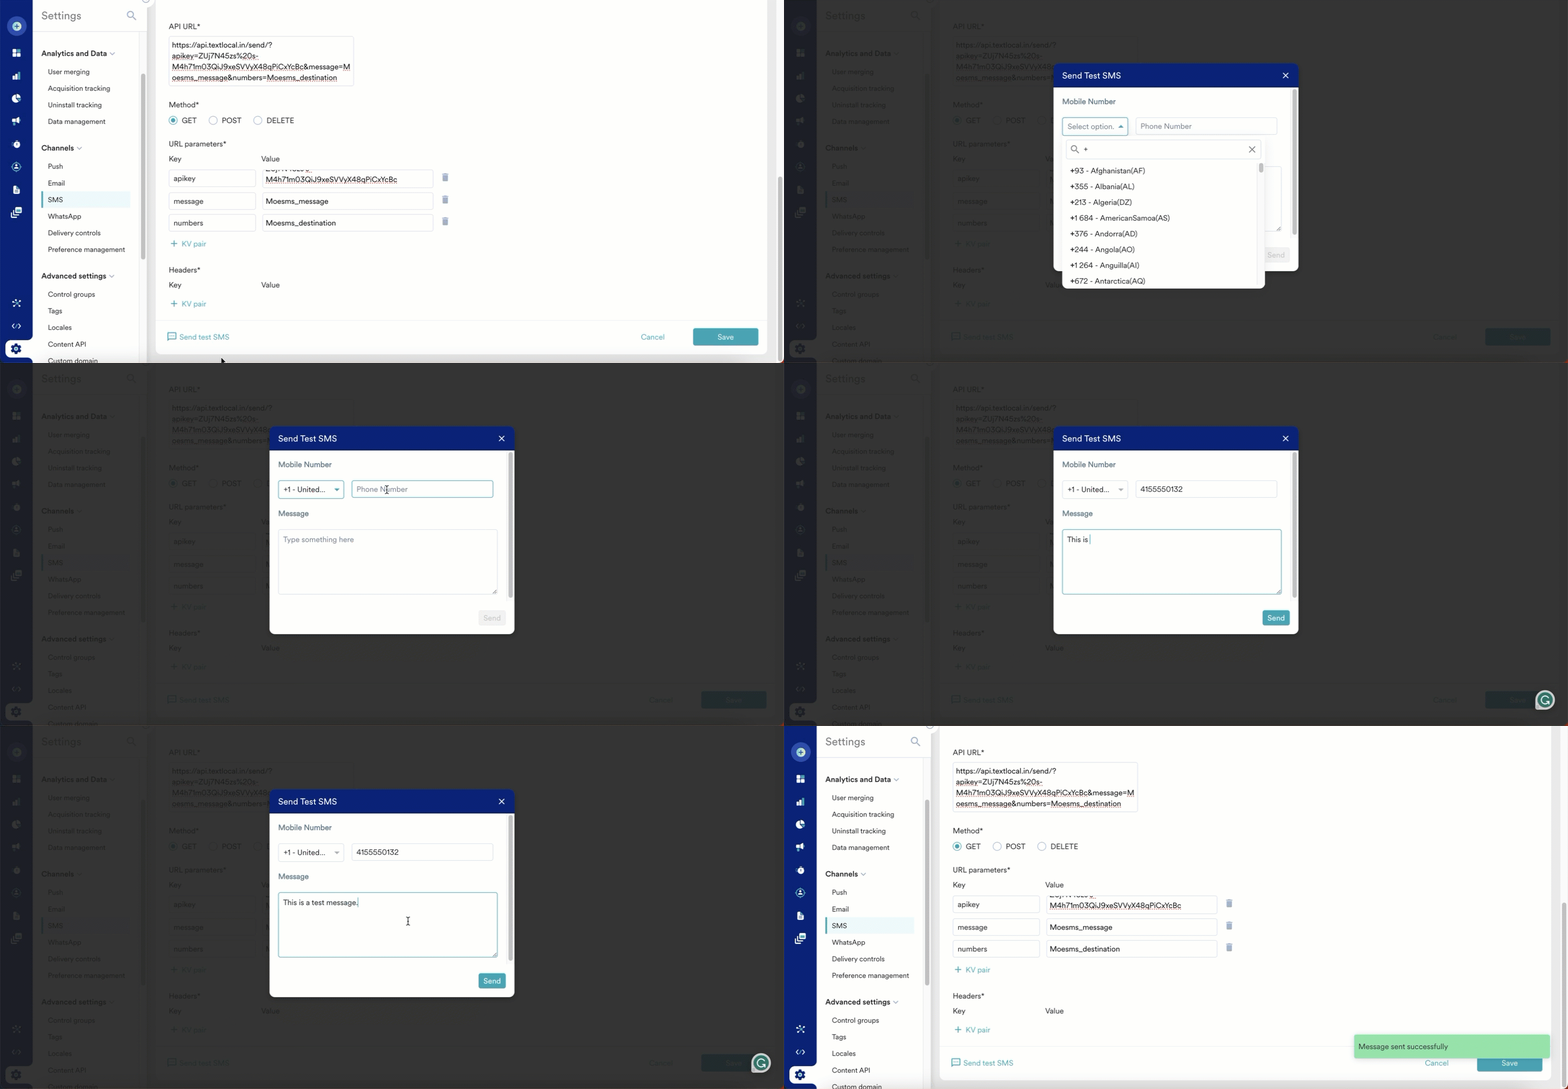
- After a successful test, click Save to save the settings.
Set the following values as specified below when defining the request parameters, headers, or body:
- Destination Number Key as Moesms_destination
- Message Key as Moesms_message
- DLT Template ID as Moesms_dltTemplateId (This is for clients operating in India)
- Campaign ID as Moesms_campaignId (You can use this attribute in the POST and GET methods, not in the DELETE method).
Personalize API Requests
You can add personalization to the API requests for reporting or analysis purposes. You can pass the following user attributes and campaign attributes as dynamic attributes:- User attributes: All attributes that are available in the Personalisation dialog box.
- Campaign attributes:
- Campaign ID
- Campaign name
- Campaign tags
- Team name
- Template ID
- Connector type (Promotional or Transactional)
- Creator
- Campaign creation time
- Publish time
- Last updated at
- Last updated by
- Campaign delivery type
- Conversion goal
- Conversion goal attribute
You can map the required attribute into the API’s request payload for the GET and POST methods. You can also pass multiple values for some attributes. For example, Campaign tags.The Value field under the following sections supports personalization:
- URL parameters
- Headers
-
Body type (Form and JSON only)
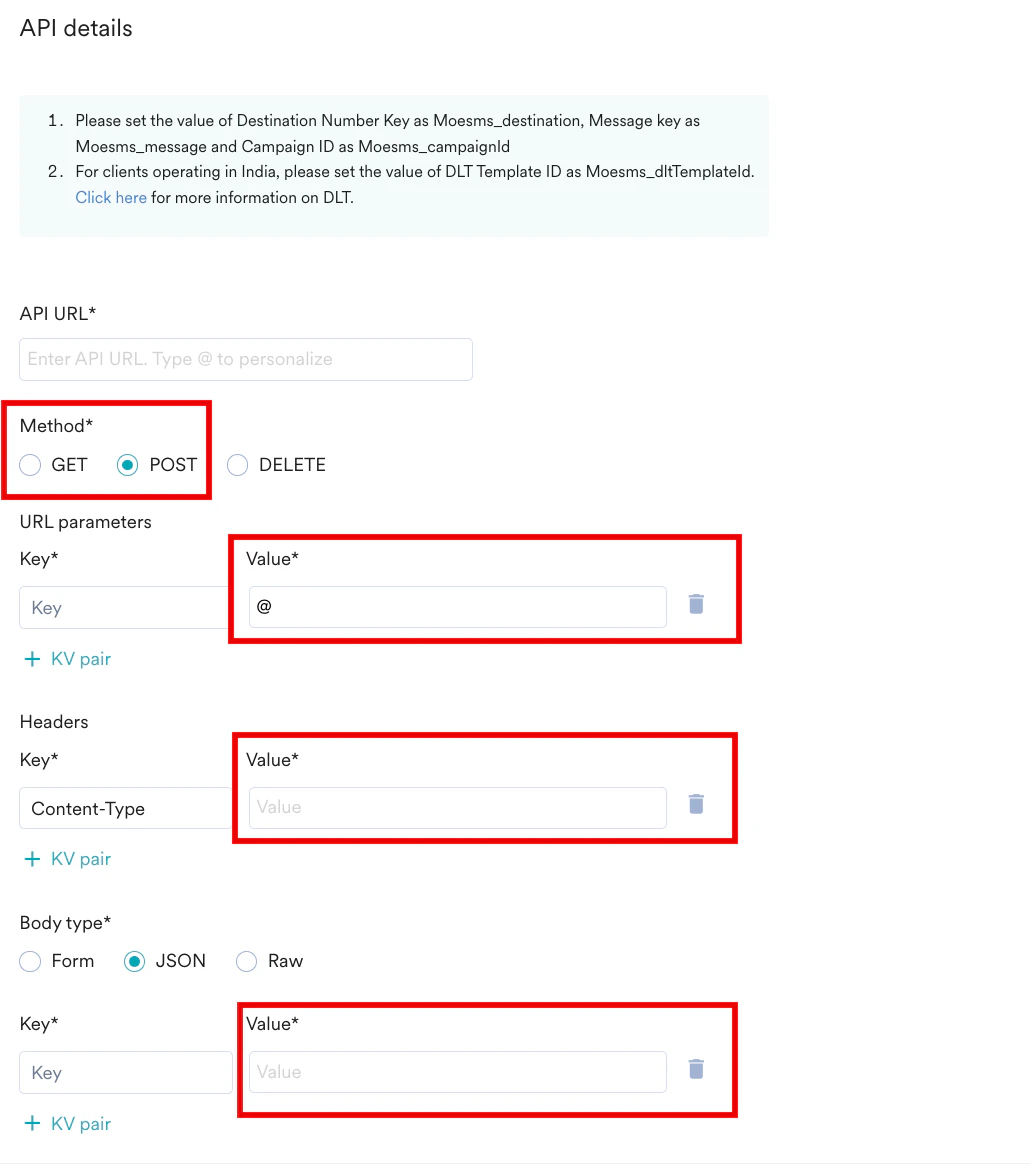
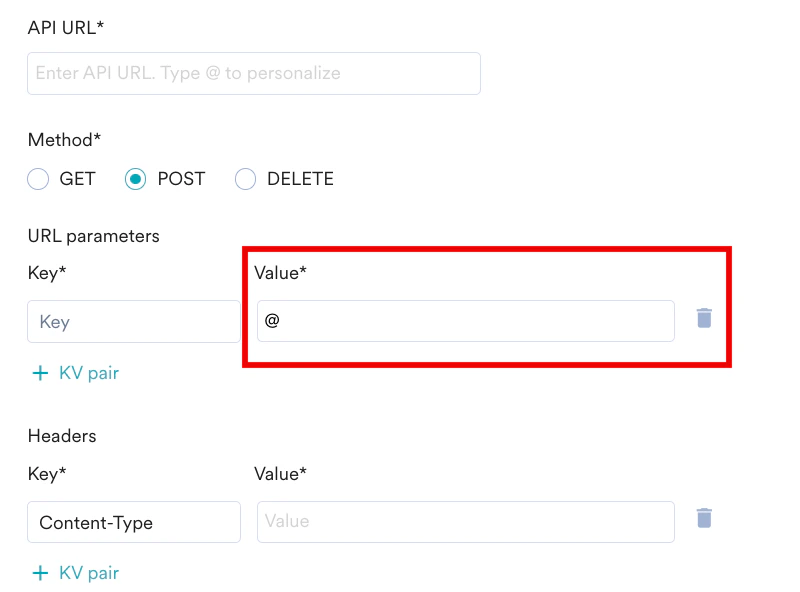
- In the required Value field, type “@”. For example, the Value field under URL parameters.
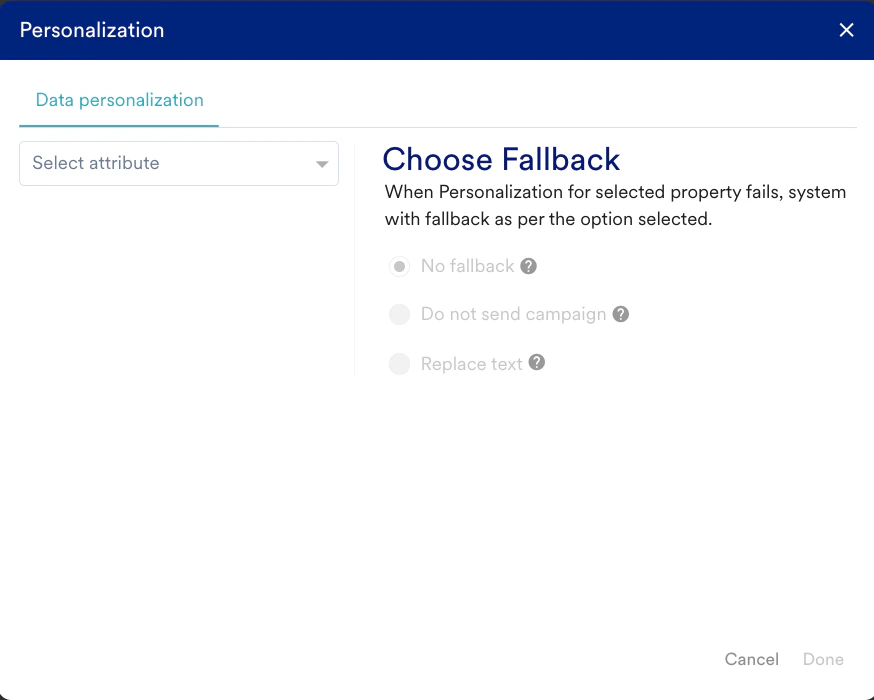
- On the Data personalization tab, in the Select attribute list, select the required attribute. For example, Campaign ID.
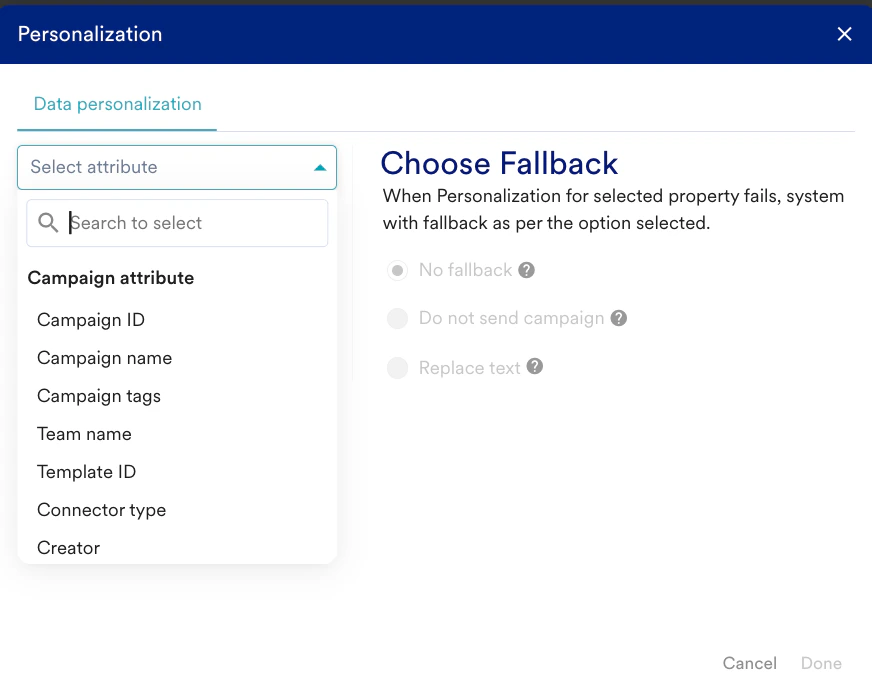
- In the Replace text field, enter a standard string that should be sent if the user-specific value can’t be resolved.
 While sending the SMS, MoEngage supports the current replacement strings for attributes included in the campaign object.
 - Click Done. The dynamic value of the personalized attribute is displayed in the selected Value field on the Sender Details page.
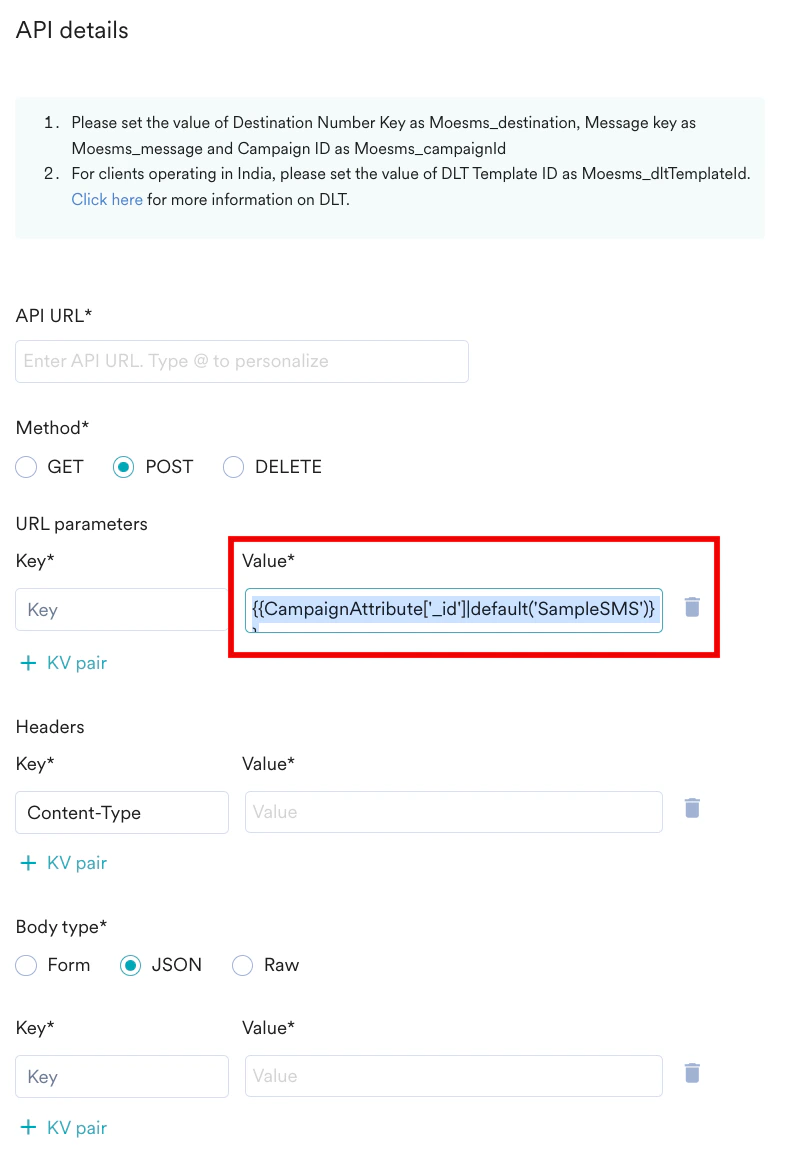
- You can add user attributes using the same process explained above.
- After you save the sender configuration, you can enable Delivery Tracking for your messages.
Delivery Tracking
Delivery tracking allows you to track the delivery status of the SMS messages sent using custom connectors (service providers). Delivery tracking, when enabled, will show a metric - Delivered*,* which helps you understand whether messages have been delivered to the user and analyze delivery failures and errors. You can use this information to clean up your delivery list periodically (by removing users for previous deliveries that were unsuccessful). This will help you avoid sending SMS campaigns to users with repeated delivery failures, thus saving costs. You can add the Delivery Tracking information once you save the connector (service provider) settings for the first time.Steps to Enable Delivery Tracking
To enable delivery tracking:- Click on the ellipsis icon by hovering over the newly added sender on the SMS settings screen.
- Select Edit. The Sender Details screen opens.
- Click Nextto enable delivery tracking.
- The Track sms delivery toggle is turned on. Turn off this toggle to disable delivery tracking.
-
Copy the SMS delivery tracking URL and paste it into the callback webhook settings of the partner’s dashboard. MoEngage generates a unique identifier called custom_connectorID under the SMS delivery tracking URL, as shown below. All senders in a connector will have the same custom_connectorID and delivery tracking URL.
SMS Delivery Tracking URL
-
Map attributes/fields in the delivery response
You can either map the fields from the delivery response or map the fields manually by choosing the desired option. This mapping helps MoEngage understand the service provider’s delivery response. To map the attributes in the delivery response, choose one of the following options:
- Map attributes of the delivery response
- Map fields manually
If you have not tested your configuration with Send a Test SMS during the previous step, click on Send a test SMS to map the attributes from the delivery response. It may take up to 15 minutes to receive the delivery callback information. Once MoEngage receives this information, it will be shown in the Dashboard.
| Field Name | Description |
| --- | --- |
| Attribute storing unique ID of the sent response | This field uniquely identifies the request. The value of this field should ideally match the value present in the Transaction or msg ID field. |
| Attribute storing Unique delivery ID field of delivery response | This field stores the unique identifier of the delivery response. The value in this field should match the value in the sent response. This will help MoEngage identify the delivery response for any given SMS. |
| Attribute storing delivery status | This field contains the delivery status of the sent SMS. This is used to calculate the Delivered metric by MoEngage. |
| Success values for delivery status | The values denote that the SMS has been delivered successfully. We mark a message as delivered if any values mentioned in this field are received as part of the response. If any other value is received in the response, it will be considered a failure by default. Enter the exact success status string your vendor sends in the delivery callback (for example,
SENT). If this value does not match the status the vendor reports, the Delivered count stays 0 even when delivery tracking is enabled. | | Attribute storing failure reason | This field contains the failure reason when an SMS delivery is unsuccessful. The failure reason can be seen in campaign analytics. For more information, refer to Failure Reasons. |
- Map fields from the delivery response
- Map fields manually
To map the fields from the delivery response:- Click Send test SMS to send a test SMS and receive a response from your service provider. Once MoEngage receives this information, it is shown in the Dashboard. You can map the fields from this response.
- The dropdowns are auto-populated with the field names parsed from the delivery response. The following image shows the sample SMS sent and the delivery response. The auto-population of the dropdowns from this response for mapping on the Dashboard is also illustrated in the image.\
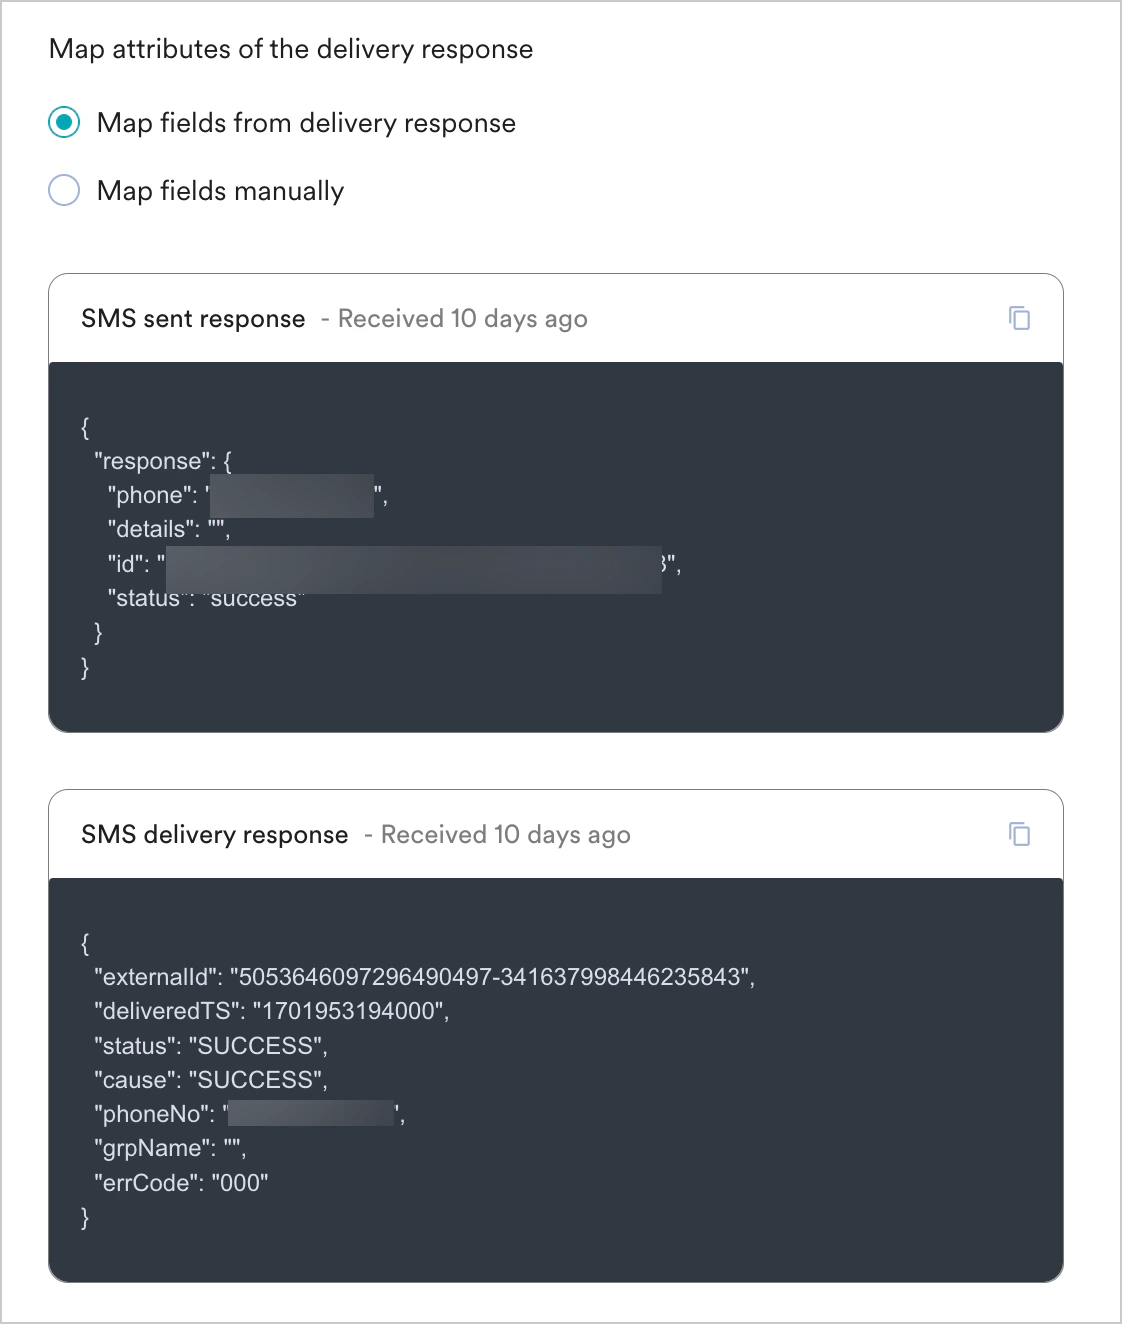
- Once the delivery response has been mapped, click Save to save the delivery callback configuration.
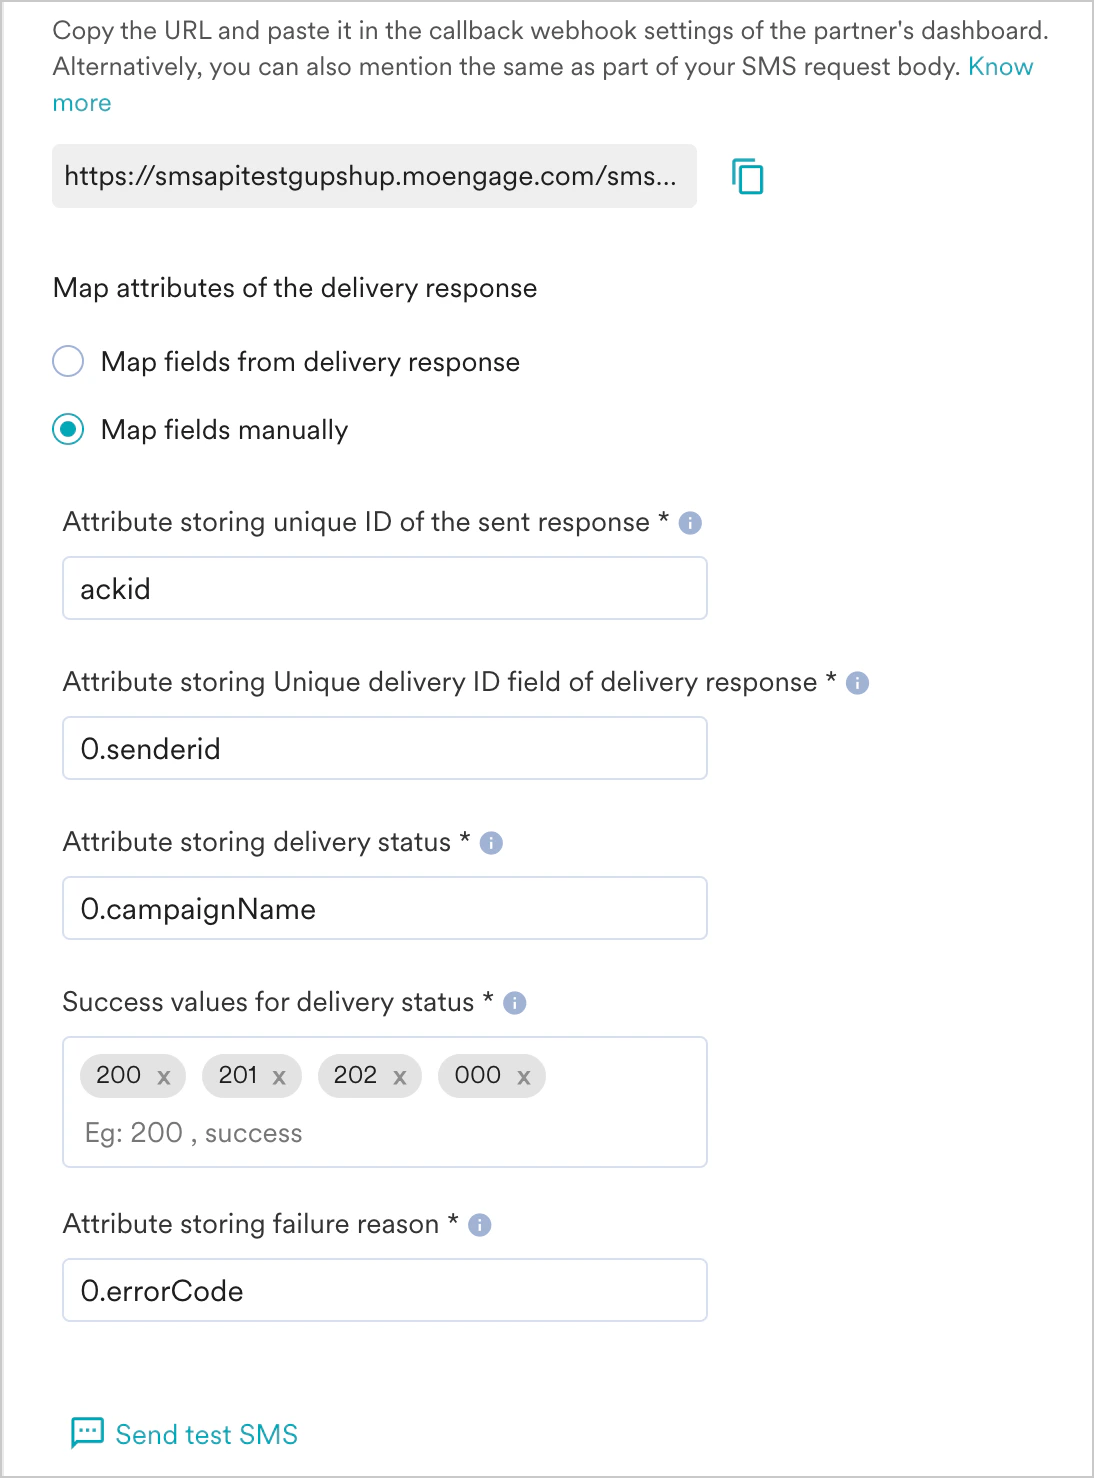
- The delivery callback is a POST request and accepts a JSON payload.
- To optimize system usage, reduce costs, and increase reliability, the delivery callback response payload should not exceed 150 KB in size. MoEngage sends a 413 Bad Request error if the response exceeds this limit. In such cases, it is recommended to reduce the payload size and resend the response. MoEngage recommends updating your payload creation code if this error is observed consistently.
- Only Admins and Managers can configure Delivery Tracking in MoEngage.
- Delivery callbacks must be sent one per message. Bulk or batched callbacks that report multiple messages in a single call are not supported. MoEngage counts such a callback as a single delivery, which under-reports the Delivered count.